Pages

Monday, December 23, 2013

I've had me a day...

I was going to write a post all about how my awesome and beautiful gingerbread house came to be.  In the past, I've made houses that looked like this:

 2010, first gingerbread house ever.  Construction was a little saggy, but I did a pretty good job piping stuff considering I'm really, really bad at it.

And This:

 2011: Ice cream cone trees, little stands for the ginger bread folks to stand on, pretty good piping again, chimney addition.

And This:

2012: Kirby and a fisherman join the scene and I toyed with pretzel windows.  It was the first year for a cereal roof, which fell off twice before finally staying put.  The boys did a lot of the piping in this one because 1) I was sick as a dog and 2) They are actually really good at piping.  They were 4 and 6, people!  4 and 6!  Look at that star!

Every year, a little more practice, a little better execution, a little more detail... I figured by the fourth go around I'd be ready to lay something gorgeous on ya'll.

But since I'd got all creative and fancy blogger pants, I thought I'd change to a different recipe for the house AND also change the glue.  This is what happened:


And this:
 And this:

Nailed it.

So what I'm giving you instead is a lesson in... I dunno... stubbornness and a shear force of will on the part of my children to consume as much gingerbread house candy as humanly possible without exploding like that guy on Monte Python. 

I ran to the store and bought graham crackers and canned frosting.  Yup.

And my son, who just turned 8 still rocked it with the piping.  Look at those icicles!

And my son who is about to turn 6 is rockin' some hella-cool architecture skillz.


 And I got to put my cereal roof on again.

And the moral of the story is that no matter what you have planned for the holidays, if you're with people you love, it's time well spent no matter how it turns out.

Tuesday, December 17, 2013

12 Days of Christmas Treats Day 12: Applesauce Ornaments

12 Days of Christmas Treats Day 12: Applesauce and Cinnamon Ornaments

     "What?" you say.  How come no eating food stuffs on the last day of Christmas Treats?  Well, because this is the last day of Christmas Treats probably forever.  It takes a lot out of me to do such a long session and during this really busy time of year, I just can't take so much time away from my family!  I will probably do some Christmas posts next year, but I think 12 Days has run its course.*  So I'm ending on a beautiful note with these fun applesauce ornaments.  They are mostly made with food ingredients, so give me a little credit.  These are a great craft for kids now that school's almost out for the season and when they're baking they make your house smell yummy!  They keep their scent all winter and store pretty well if you're careful with them so they will greet you with cinnamon goodness this time next year, too!

12 Days of Christmas Treats Day 12: Applesauce and Cinnamon Ornaments

*Unless I get like 6,000 people begging me to do it again because they can't survive Christmas without me, of course.  Feel free to beg.  It probably won't take too much arm twisting, to be honest.  Commenting on my beauty and cleverness will get you far.  

12 Days of Christmas Treats Day 12: Applesauce and Cinnamon Ornaments

Cinnamon Applesauce Ornaments
1 C cinnamon
1 C applesauce
1/4 C Elmer's glue

Stir ingredients together, wrap in plastic and let sit for 1 hour.  Preheat the oven to 200°.  Roll dough out between two sheets of wax paper and cut with Christmas cookie cutters.  Don't forget the hole for hanging, a straw or a toothpick are great tools for this.  Line a cookie sheet with wax paper and bake ornaments for 2 hours, flipping half way through cooking time.  Enjoy the aroma.  When ornaments are done, remove from sheet, let cool and hang them onto your tree!  If you have time, these can also air dry, but they take a few days before they're done completely.

Word to the wise:
Don't rely on any mystical non-stick properties your cookie sheet claims to possess.  Trust me on this.  These ornaments scoff at your naivete and spit in the eye of your sheet's non-stick assertions.  They will cling to your cookie sheet with the unholy force of 1,000 possessed weasels.  We're talking honey badger level not caring about your cookie sheet's non-stickiness. 

12 Days of Christmas Treats Day 12: Applesauce and Cinnamon Ornaments

Word to the unwise:
If you did just go ahead and bake these without the wax paper, I know your pain.  Soaking the cookie sheet for a day in water should do the trick.  You'll end up with a nice clean pan, but unfortunately probably no usable ornaments...  (I think we managed to get one off.  It disappeared so either the boys broke it or the cat ate it.)

12 Days of Christmas Treats Day 12: Applesauce and Cinnamon Ornaments 

Review:
This makes really nice dough that's easy to work with.  The boys loved making all sorts of figures with it and they actually hold up pretty well.

Monday, December 16, 2013

12 Days of Christmas Treats Day 11: Lasagna

Another Christmas tradition my Mom started is the Christmas Day Lasagna. She got tired of cooking her tail off all day on Christmas to make a turkey happen so she started baking lasagnas on Christmas Eve and re-heating them on Christmas day. She used jarred sauce, and you certainly can, too, but I like to make my own sauce.  This lasagna uses uncooked noodles.  Don't worry, you can use any lasagna noodle, you don't have to buy the fancy no-cook ones.  Trust me on this, it works!  My friend Susan has been doing it this way for years, and I have too since she told me about it.

Make-ahead vegetarian lasagna for Christmas dinner
Sauce:
1 Tbs olive oil
1 C roughly chopped onion
¾ C roughly chopped green pepper (about 1 medium)
2 C sliced button mushrooms
½ portobello mushroom, cubed, gills and stems removed
2 cloves garlic, pressed
¼ C white wine
1 Tbs tomato paste
3 C canned crushed tomatoes and juice (I used some I canned myself, it took 2 pints)
¼ tsp pepper
1 tsp salt
1 tsp oregano
1 Tbs basil

In a large frying pan, heat olive oil then add onion, green pepper, button and portobello mushrooms and cook over medium-high heat for 5-8 minutes until vegetables have softened, but not browned. Press garlic into pan and cook until the aroma blooms, about 10 seconds. Deglaze the pan with with white wine and cook until wine has boiled off. Add tomato paste, tomatoes, and salt and pepper. Boil for 10 minutes, until the mixture is more sauce and less soup. Turn off heat and stir in oregano and basil. Hold off to the side while you assemble the lasagna or keep in fridge for a few days until you're ready to use it.

Make ahead vegetarian lasagna for Christmas dinner

Lasagna:
1 box whole wheat lasagna noodles, uncooked
1 sauce recipe
32 oz ricotta
5 oz fresh spinach, washed and lightly drained
4 oz chanterelle or button mushrooms
8 oz mozzarella, shredded

Decor:
1 slice carrot, cut into star shape (alt, yellow pepper)
½ green pepper, sliced
4 cherry tomatoes, halved

Preheat oven to 325°. Place three uncooked noodles in the base of a 9X13 inch pan. Snap a quarter piece off another noodle and place it across the short side of the pan where the other noodles don't touch. Pour ½ of the sauce recipe over the noodles. Then ½ of the ricotta cheese. Shake the extra water off the spinach, but not to the point of being totally dry, and add a spinach layer. Next comes another layer of lasagna noodles, this time using four and ¾ noodles. The rest of the sauce comes next. Then a layer of chanterelle or button mushrooms. Carefully spoon the remaining ricotta cheese over the mushrooms to create a white field. Top with shredded mozzarella. Arrange the green peppers into a tree shape, decorate it with red cherry tomato ornaments, and top it with the carrot star! Bake for 1 hour or until the noodles are soft. To put in the fridge, just let cool, cover with plastic or aluminum, and re-heat in the oven at 350° covered until warm (about 45 minutes).

Make ahead Vegetarian Lasagna for Christmas Dinner

Review:

We love this lasagna (even though my youngest will tell you he hates it, once he figures out it's like pizza and pasta all mixed up together, two servings will be in his belly before the night is out).  You can make it with meat or any filling you like, ours is hardly ever the same twice!

Friday, December 13, 2013

12 Days of Christmas Cookies Day 10: World's Best Brownies

     I have a confession to make.  My Mom had the secret to the world's best brownies.  She sent me the recipe 10 years ago.  And I've never made them...  *hanging head in shame*  The problem with making a pan of brownies is that I will eat a pan of brownies.  By myself.  Hiding in the closet so as not to be interrupted.  And I will be happy.  And covered in crumbs.  And in need of a crane to get out of the house.  So in the interest of not putting myself into a chocolate coma, I don't make brownies.  I once made a pan of vegan brownies that had black beans in it just to see what would happen.  I went up a pant size is what happened.  So just for you guys and just for Christmas I have decided to face my addiction and make these just for you.  If you do indeed become a closet brownie eater, don't come cryin' to me.  I gots my own problems.  Like how to hide this empty pan as quickly as possible.


World's Best Brownies
Yield: 1 9X13 inch pan

1/2 C butter
4 oz baking chocolate
4 eggs at room temperature
1/2 tsp salt
2 C sugar
1 tsp vanilla
1 C flour
1 C roughly chopped pecans (opt)

Prepare 9X13 inch pan by lining the bottom with parchment paper.  Preheat oven to 350°. Melt chocolate and butter in a double boiler or the microwave (being careful it doesn't boil).  Place in the refrigerator for a few minutes.  Beat eggs and salt until light in color and foamy.  Continue beating and gradually add sugar and vanilla until well creamed.  Remove chocolate from refrigerator.  With a few swift strokes, manually combine the cooled chocolate mixture into the eggs and sugar.  Before the mixture becomes uniformly colored, fold in (again by hand) flour.  If you want to add nuts, before flour is uniformly colored, stir in pecans gently.  Bake for 25 minutes if you want super gooey, not-quite finished brownies, 40 minutes, if you like them soft, but not oozing.  A toothpick test won't work well, but if you touch lightly in the middle of the pan, it should not leave a dent and the top will look done.  Remove the pan from the oven, run a knife around the edges and invert the baking pan over a cookie rack.  Remove pan and wait 5 minutes before peeling off paper.  Or you can just eat them out of the pan with a fork in your closet...


Review:
These are the best brownies in the entire world.

Thursday, December 12, 2013

12 Days of Christmas Treats Day 9: Chewy Eggnog Cookies


     Have I got a recipe for you eggnog lovers out there!  I always love a chewy cookie but am rarely successful in making one at home.  The folks at America's Test Kitchen came up with an easy one that works pretty well.  It's not as ooey-gooey chewy as the ones at the store, but it's also not sporting the entire contents of a university chem lab in the ingredient list.  A couple of years ago I created an eggnog cookie with quite a bit more nog in it.  I was surprised how little it took in these to make a recognizable flavor.  This recipe is entirely an ATK invention, the only thing I did was sub in eggnog for the milk.

Chewy Eggnog Cookies
Yield: 2 dozen

2 1/4 C flour
1 tsp baking powder
1/2 tsp baking soda
1 1/2 C sugar, plus more for rolling
2 oz cream cheese, cut into 8 pieces
6 Tbs unsalted butter, melted and still warm
1/2 C vegetable oil
1 large egg
1 Tbs eggnog
2 tsp vanilla extract

Adjust an oven rack to the middle position and heat the oven to 350°.  Line two large rimmed baking sheets with parchment paper.  Whisk the flour, baking powder, baking soda, and salt together in a medium bowl.  Set aside.

Place 1 1/2 C sugar and the cream cheese in a large bowl.  Place the remaining 1/3 C sugar in a shallow baking dish or pie plate and set aside.  Pour the warm butter over the sugar and cream cheese and whisk to combine (some small lumps of cream cheese will remain but will smooth out later).  Whisk in the oil until incorporated.  Add the egg, milk, and vanilla; continue to whisk until smooth.  Add the flour mixture and mix with a rubber spatula until a soft homogenous dough forms.

Divide the dough into 24 equal pieces, about 2 Tbs each.  Using your hands, roll each piece of dough into a ball (handle dough as briefly as possible as overworking will result in flatter cookies).  Working in batches, roll the balls in sugar to coat and set on the prepared baking sheet.  12 dough balls per sheet.  Using the bottom of a drinking glass, flatten the dough balls until 2 inches in diameter.  Sprinkle the tops of the cookies evenly with the remaining sugar, using 2 tsp for each sheet. (Discard the remaining sugar.)

Bake the cookies, one sheet at a time, until the edges are set and beginning to brown, 11 to 13 minutes, rotating the sheet after 7 minutes.  Cool the cookies on the baking sheet for 5 minutes; using a wide metal spatula, transfer the cookies to a wire rack and cool to room temp.


Notes:
      So I used a cookie scoop instead of dividing by 24 to make my cookies.  The result was around 54 thinner cookies.  This is probably why they weren't super chewy.  (They're still super delicious!)

Wednesday, December 11, 2013

12 Days of Christmas Treats Day 8: Dipped Ritz Cracker Sandwiches

    The first time I had Ritz peanut butter crackers dipped in white chocolate I was at the Christmas tree farm of an old friend of my family.  When she told me about them, I was skeptical.  Until I ate one.  Hello.  The problem with white chocolate though, is it's hard to find one that doesn't have all kinds of chemicals in it.  So I decided to try dark chocolate this year.  


     Instead of using just my family as lab rats, I subjected three unsuspecting food bloggers as well.  This year I joined The Great Food Blogger Cookie Swap for the first time.  Besides providing a link-up to all kinds of great bloggers, it raises money to fight children's cancer.  This year they've raised over $13,000!  It's not too late to donate!  Go to The Great Food Blogger Cookie Swap webpage find the donation button at the bottom. 

The Great Food Blogger Cookies Swap 2013

     The swap works is just like a regular mail swap: you get three names, three other people get your name, you send out three dozen cookies, and you receive three dozen in return.  The only difference here is that we link to each other's websites and share the recipe with you guys, too!
 
These tree bloggers sent me cookies:

The boy's favorites were all of them.  "Oh Mom!  These are my favorite!"  "You just said that about the other ones." "I know, it is, too!"  "I agree."

I sent these treats to these three bloggers: 

I hope they arrived in one piece, ladies!


And now it's time to share my recipe with you!  Start with the Ritz Crackers from  day one of the 12 Days of Christmas.

Ritzy Peanut Butter Crackers in Chocolate
(1 Recipe of Crackers yields about 24 sandwiches)
6 oz Enjoy Life Semi-Sweet Chocolate Chips
10 oz Felchlin Old World Chocolate 74% Organic
Zest of 1 tangerine

Make cracker sandwiches using about ¼ tsp peanut butter per sandwich. (I like a lot on mine generally, but much more than ¼ tsp tends to seep out the sides and melt into the chocolate.)

     In a double-boiler, melt 6 oz of semi-sweet chocolate chips with 10oz dark chocolate, making sure not to scrape the sides (this can introduce crystals into the chocolate that will make it seize). You can also do it in the microwave in a glass dish by setting it to half power and microwaving them for about a minute (chocolate is done when about half the chips have melted, stir them up and use the heat of the melted ones to soften the ones that aren't quite ready.)

     Dip sandwiches in chocolate using a couple of forks to aid in flipping, removing, and not burning your fingers off, place on parchment paper, and top with orange zest. Leave to dry.


Notes:
If you do make these with white chocolate instead, try topping them with crushed up candy canes!

Review:
The chocolate chips take some of the bitterness out of the dark chocolate and the orange brightens it up.  My kids prefer it without the zest, but the more adult palates in our household enjoyed them immensely.  

To see the rest of the round-up visit Love and Olive Oil for one half and The Little Kitchen for the rest!

Tuesday, December 10, 2013

12 Days of Christmas Treats Day 7: Russian Tea


     Russia has a very rich tea culture.  According to Wikipedia, nearly 82% of Russians drink tea daily.  They drink tea from fancy teapots, they have intricate brewing methods, they use really cool special tea cups.  But they don't drink Russian Tea.  Just like fortune cookies, garlic bread, and tortilla chips, Russian tea is an American invention.  A delicious one.  A lot of the recipes you'll find online include Tang and lemonade mix.  Uh.  Gross much?  Growing up we made it with black tea and orange juice.  We drank it at Christmastime.  I liked it so much, I made a cookie out of it a couple of years ago.  There are a lot of recipes online that make party size portions, but I often like to make one for myself in the morning, so here is an individual serving portion.


Russian Tea
Serves One

1 C brewed black tea
3 Tbs orange juice
2 tsp sugar
1/8 tsp ground cloves
1/8 tsp ground cinnamon

Brew a cup of tea, add juice, sugar, cloves and cinnamon.  Stir and enjoy warm or cold.


Review:
My boys aren't big fans.  They prefer their tea to include milk and chocolate and exclude tea, but I love this and I expect other sweet tea fans will, too.

Monday, December 9, 2013

12 Days of Christmas Treats Day 6: Thumbprint Cookies

Crackers on the Couch 12 Days of Christmas Treats Day 6: Thumbprint Cookies

     Look out!  Ya'll are about to get Rich Rolled.  This time you'll not be getting unexpectedly serenaded by an 80's crooner, you'll be devouring loads of tasty jam-filled cookies.  These are another of the last-minute phone call to Dad cookies.  They also came from the Better Homes New Cookbook by Meredith Press copyright 1965.  I used a jar of mixed fruit jam I made in the Summer, but any pretty jam will do.  In fact, you can swap out the jam for a Hershey's Kiss if that's the kind of tune your taste buds like to dance to.

Rich Rolled Cookie
Yield: 44 cookies

1 C butter
2/3 C sugar
1 egg
2 ½ C sifted flour
½ tsp salt
1 tsp vanilla
1/4 tsp jam per cookie

Cream butter sugar and egg. In a smaller bowl sift together flour and salt. Add flour mixture to the creamed mixture and combine thoroughly. Add vanilla. Chill dough 3-4 hours before rolling (or about 30 minutes in the freezer). Roll balls, press cookies in the center with a finger or thumb, use 1/4 tsp jam to fill the print.  Bake at 350° 8-10 min or until slightly colored.

Crackers on the Couch 12 Days of Christmas Treats Day 6: Thumbprint Cookies

Review:
My family loves these!  Yours will, too. 


Crackers on the Couch 12 Days of Christmas Treats Day 6: Thumbprint Cookies


Friday, December 6, 2013

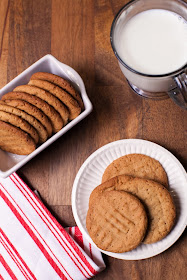
12 Days of Christmas Treats Day 5: Peanut Butter Cookies

     Can I just say that my Dad is a saint?  Every Christmas that I've been doing the 12 Days for you guys, my Dad gets a phone call at the last minute from his frazzled daughter begging him to look through Mom's old cookbooks and recipe box for weird cookies he doesn't even remember eating half the time.  The recipe box never seems to have anything in it I'm looking for and the cookbooks have terrible tables of contents with mislabeled page numbers.  One even has a recipe title listed in the index that isn't actually in the book at all.  This cookie, though, everybody remembers because it's delicious.  I have modified it a bit from its 1965 beginnings to reflect my preferences (butter instead of shortening, etc), but it's still a delicious cookie your friends and family will love.

12 Days of Christmas Treats Day 5: Peanut Butter Cookies

Peanut Butter Cookie 
From Better Homes New Cookbook 
by Meredith Press 1965
Yield: almost 6 dozen
1 C butter, softened
1 C sugar
1 C brown sugar
2 eggs
1 tsp vanilla
1 C peanut butter
2 C sifted flour
2 tsp baking soda
½ tsp salt

Cream butter, sugars, eggs, and vanilla.  Add peanut butter.  Sift dry ingredients together, stir in.  Drop by rounded spoonfulls, make a criss-cross pattern on the top of each cookie with floured fork.  Bake at 350° for 10 min.

Review:
These are crispy and crunchity and peanut buttery and you will like them.

Thursday, December 5, 2013

12 Days of Christmas Treats Day 4: Panettone

     My husband and I, like many people, aren't the biggest fans of fruitcake.  A few years ago, we bought a panettone at Costco one Christmas.  It was the yummiest white bread we ever had with a tiny bit of dried fruit.  The heavenliest, softest, perfectest fruit cake ever invented for infinity.  Cut a piece off, put it in the toaster and slap a little butter on it.  Best breakfast in the entire world.  It never even occurred to me to make my own until I saw panettone papers in a specialty shop.  The angels above opened their heavenly throats and warbled a melodious tune.  Or maybe that was me singing to myself in the baking row.  Only the security cameras can tell for sure.  I found this delicious recipe for panettone on King Arthur Flour.  I modified the fruit amounts somewhat and have adjusted the cooking time to make some mini panettones for sharing!  This recipe uses a biga, which is a quick, overnight starter culture, it helps develop the flavor of a good dough.  Trust me, the extra time is worth it.


Mini Panettone
Yield: 8

Biga (Overnight Starter)
3/4 cup King Arthur Unbleached All-Purpose Flour
1/16 teaspoon yeast (just a pinch)
1/3 cup water

Dough
all of the biga 

2 1/4 cups King Arthur Unbleached All-Purpose Flour
1/4 cup warm water
2 large eggs
1/4 cup unsalted butter, softened
1 1/4 teaspoons salt
1/4 tsp vanilla extract
1/8 tsp orange extract
1/8 tsp lemon extract
2 1/4 teaspoons active dry yeast OR 1 tablespoon instant yeast
1/3 cup sugar
1/2 cup golden raisins
1/4 cup chopped dried apricots
1/4 cup dried currants
1/4 cup chopped dried pineapple
1 tablespoon orange zest
1 tablespoon lemon zest
The Biga: Combine the biga ingredients in a medium-sized mixing bowl, cover, and allow them to rest overnight (8 to 12 hours).

Dough: Combine all of the dough ingredients except the fruit, and mix and knead them together—by hand, mixer or bread machine—till you've made a soft, smooth dough. Allow the dough to rise, covered, for 1 to 1 1/2 hours, or until it's puffy (though not necessarily doubled in bulk). Gently deflate the dough, and knead in the fruits and zest.

Divide dough into 8 mini panettone cups.  Place cups on a baking sheet and cover with a sheet of plastic wrap.  Let the dough rise till it's just crested over the rims of the cups.  (It took mine three hours, but it could take much less time if your house is warmer than mine...)

Bake the bread in a preheated 400°F oven for 5 minutes; reduce the oven heat to 375°F and bake an additional 5 minutes; then reduce the heat to 350°F and bake for 10-15 minutes, tenting with aluminum foil if the crust appears to be browning too quickly. Remove the panettone from the oven and cool completely.  You'll know they're done when you thump the bottom and it sounds hollow.


Review:
This is great with mulled orange juice or a cup of coffee.  My kids aren't big fans, so this might be a more adult recipe.  I don't know about you, but I'm OK with that.

Wednesday, December 4, 2013

12 Days of Christmas Treats Day 3: Mulled Orange Juice

     When my brother and I were growing up, we didn't have much in the way of family nearby.  Our Grandparents lived 300 miles away.   Our closest Uncle was nearly 600.  We had a few third cousins around but they were usually busy with their own Uncles and Grandparents during the holidays.  This meant my Mom was free to set up any darn traditions she wanted.  And she was good at it.  To add humidity to the air and make the house smell lovely in the weeks preceding Christmas, Mom would simmer oranges, cinnamon, and cloves on the stove. We also made pomanders on occasion.  Yesterday, I mentioned our yearly Christmas Eve ritual. 

      I have also told the story of sitting with my Mom on Christmas Day waiting for the rest of the family to wake up, savoring the last predawn moments watching the tree, listening to Christmas music, and drinking a warm drink. Mom used to heat up a bunch of different juices. We had warm cranberry juice, warm grape juice, hot apple juice (of course), but her favorite to make around Christmas time was mulled orange juice.

     Mulled Orange Juice uses the same spices as her simmer fragrance and smells just like Christmas to me. Mom made hers with ground spices in the microwave using “a little of this, a little of that” but the ground spices always ended up sinking leaving a spice sludge at the bottom. This way, you get the flavor without the ick.

Crackers on the Couch 12 Days of Christmas Treats Day 3: Mulled Orange Juice

Christmas Mulled Orange Juice
Serves 4 (scales easily, can be made individually in the microwave also)

5 C orange juice
1 tsp whole cloves
2 sticks cinnamon
¼ tsp freshly grated nutmeg

Boil orange juice, cloves, and cinnamon for about 5 minutes until it takes on the flavor of the spices. Fish the cloves and cinnamon out with a slotted spoon or pour though a strainer. Portion into serving mugs and top with a smidge of nutmeg.

Note:
I have discovered that using high pulp orange juice clogs the strainer; a low or no pulp juice is really the way to go with this.

Shapow!! Bonus Craft!
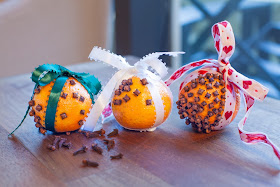
Crackers on the Couch 12 Days of Christmas Treats Day 3: Orange and Clove Pomanders

Pomanders
  1. Tie ribbon around orange like wrapping a package
  2. Use a toothpick to make a pilot hole
  3. Poke a clove into it
  4. Repeat 3 and 4 until you have the pattern you like
  5. Allow to air dry, checking for mold
These will keep for a long time if properly dried. Buy cloves in bulk if you can find them, they can get pricy paying baking isle prices!  This is a great craft for little guys.  Mine had fun making patterns and faces and since we used tangerines, we got some coverage before their attention span wore out.

Tuesday, December 3, 2013

12 Days of Christmas Treats Day 2: Cheese Ball

     On Christmas Eve every year, we continue a tradition my Mom started when I was a kid. We sit in the dark, listen to Christmas music, sing carols, read the Bible, and eat like it's going out of style. When I was a kid, a never ending parade of homemade cookies marched into our bellies followed by multiple eggnog chasers. When my husband and I were first married, I wanted to continue the tradition, but I knew that Christmas Eve was going to be when my hubby wrapped all my gifts. So I made him a tray. It had a cheese ball, crackers, and sausages as well as a few cookies because I had arranged to be out for a few hours with a friend to give him some privacy and since it was dinnertime, he'd need some nourishment.  Over the years, the cookie tray has reverted to a more cookie-centric theme, but the cheese ball has stayed. My husband absolutely loves cheese balls. That first year, I bought one from a store, never having actually eaten one before. Once I got a mouthful though, I realized that in the future, homemade was the way to go.   I've made several recipes through the years, but this is the one I've come to like best.

12 Days of Christmas Treats Day 2: Homemade Cheese Ball perfect for any party

Easy Cheese Ball
Yield: 1 Ball
8 oz cream cheese, softened (I like Beecher's Blank Slate*, but regular cream cheese will do)
1 1/2 C shredded sharp cheddar cheese
1 heaping Tbs green onions, greens and whites (about 1 green onion)
1/8 tbs finely chopped rosemary
1/4 C Sliced almonds

Combine cream cheese, cheddar cheese, onion, and rosemary, mixing well until thoroughly combined.  (Hands work best for this.)  Cover with plastic wrap and refrigerate for at least 1 hour, up to two days.  Form cheese mixture into a ball and roll to coat in almonds.

*Beecher's is a local cheese maker, though they do now have some shops in New York.  If you are using Beecher's, use a medium cheddar, since it is a little stronger than most cream cheese.

12 Days of Christmas Treats Day 2: Mini Cheese Balls individual cheese balls on pretzel sticks

This same recipe makes about a dozen mini cheese balls which are delicious rolled in finely chopped pecans and served with a pretzel stick.  Do not insert pretzels until just before serving as they can get soggy in the fridge.

Review:
This is a nice ball, not too overpowering but still very flavorful.  Tweak it by adding some thyme or a little honey.  I've even had a cheese ball with pineapple in it which is pretty good, too!  Oh, and this just happens to go perfectly with the homemade Ritz crackers from yesterday!

Monday, December 2, 2013

12 Days of Christmas Treats Returns!! Day 1: Crackers?!


Hi Guys!!!

     Welcome back to the 12 Days of Christmas! This year, I'm branching out of just cookies, and giving you some more savory treats for your cookie tray. There will still be cookies, so don't worry, but today I thought I'd start with a cracker. About time a blog called “Crackers on the Couch” included a cracker recipe, wouldn't you say? I'll be using these crackers a few times during this series, so make a bunch and keep them in an airtight container. (If they get a little soggy, you can crisp them in the oven at 400° for about 4 minutes.) This recipe came from Crackers and Dips: More than 50 Homemade Snacks by Ivy Manning. Bear with me, this looks like a crazy complicated recipe, but it's actually really simple.

Homemade Ritz Crackers

Recipe:
Yield: 50 crackers
4 Tbs chilled unsalted butter
2 C unbleached all-purpose flour, plus more for rolling
2 tsp baking powder
2 tsp sugar
1 tsp fine sea salt
2 tsp barley malt syrup* or dark corn syrup
1 Tbs vegetable oil
½ C water
1 egg beaten with 1 Tbs water
1 tsp kosher salt

*You can find barley malt syrup (a.k.a. barley malt extract) at beer making supply shops. You may have to buy a bunch of it, but it really does help add to the authentic flavor of these.  You can also find it on Amazon from several sellers.

Cut the butter into ¼ inch chunks and place in the freezer while combining the dry ingredients. In a food processor or large bowl, combine the flour, baking powder, sugar, and sea salt and pulse or whisk to combine. Add the butter and pulse or cut the butter into the flour using a pastry cutter or your fingers until the butter is in tiny pieces and the mixture looks like coarse cornmeal, about 15 one-second pulses.

In a small bowl, whisk together the barley malt syrup, vegetable oil, and ½ C of the water, stirring to dissolve the malt extract. Gradually add the water mixture to the food processor or bowl, pulsing or mixing with a wooden spoon to combine. Gather up the dough into a ball, flatten into a disk, cover in plastic wrap, and chill for at least 1 hour and up to 2 days.

Preheat the oven to 400° F. Line two baking sheets with silicone baking mats or parchment paper. Roll the dough out on a lightly floured surface until it is 1/16 inches thick, picking up the dough occasionally and rotating it to make sure it's not sticking to the work surface. Using a round scalloped cookie cutter, cut the dough into 2 ½ inch rounds; reserve the scraps.

Fill one baking sheet with crackers, spacing them about ½ inch apart. Brush the crackers lightly with the beaten egg and then prick the crackers several times with a fork (a spoke pattern adds visual appeal). Sprinkle the crackers sparingly with some of the kosher salt and bake for 4 minutes; rotate the pan from back to front. Reduce the oven temperature to 375° F and continue to bake until the crackers are light golden brown and firm to the touch, about 8 minutes. Transfer to a cooling rack.

Return the oven temp to 400° F and repeat the process with the remaining dough and scraps, baking the crackers one baking sheet at a time.

Review:
These are a nice cracker! They taste very much like Ritz crackers, but without all the extra garbage associated with a store-bought snack.  Hope you guys are as excited as I am for this years 12 Days of Christmas Treats!

Friday, November 29, 2013

Welcome to Our Laboratory...

(Extra points if you read that in Edgar Oliver's voice.)

Lava lamp, plasma disk, fiberoptic finger lights for a Science Party
The boys got a Science Party for their birthdays this year!

Lab Coat and Lanyard Kit for a Science Party
     As they entered the lab, all the kids got a badge and a lab coat first thing, and then we turned them loose to experiment to their heart's content!  There were 5 stations.

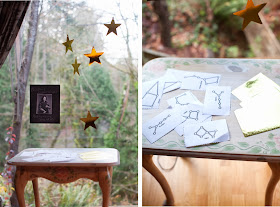
Learning about constellations at our Science Party
     The kids learned a little about Interplanet Janet at Nicolaus Copernicus' Astronomy station, where they put star stickers on constellation sewing cards I found at Mrs. Home Ec's blog.

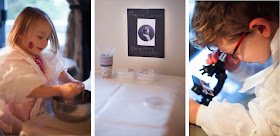
Non-Newtonian Fluid, FX/Insta Snow, Microscope action at our Science Party
     I'm not sure if they were more frightened, or mad, or excited, or glad to be playing with non-newtonian fluid, making fx snow, and exploring algae with a microscope in Marie Curie's Chemistry Station.  I'm thinking excited and glad, though...  We pre-measured the snow into some petri dishes and they used disposable pipettes to add water a little at a time.

Static Electricity, Plasma Dish, Plasma Ball, and Fiber Optic Finger Lasers for our Science Party
     In Nicola Tesla's station, we were talkin' 'bout electricity.  Mostly the static kind, but we also had a pocket plasma disk, some fiber optic finger lasers,  and a rockin' cool plasma ball we borrowed from a friend.

Marble maze, Marble tunnels, and paper airplanes for Eintein's physics station at our Science Party.
     In Albert Einstein's Physics Station, marbles, balls, and paper airplanes became victims of gravity. (down-de-down-down-down)

Dry ice adds a super cool element to our Science Party     David (a.k.a. our friend with the plasma ball) is also a super science geek and offered to show the kids some tricks with dry ice.  You can't skate a figure 8 on dry ice, but you can do some pretty wikkid science with it!  I was glad we had some beakers on hand as decoration because they totally added to the sciencey vibe!

Ellen Swallow Richards coined the word ecology and we composted all our partyware in her honor after our Science Party!
     Because we wouldn't want to be accused of wasting energy, and also to honor the totally awesome Ellen Swallow Richards, who coined the word "ecology" as well as being an MIT grad and the inventor of Home Economics (as science, y'all), all our utensils, plates, cups, napkins, and even the trash bag were biodegradable and disposed of in the Ellen Swallow Richards Composting Station.

The ol' stand-by dye the carnations experiment.
     For decor, the boys and I performed the carnations in the colored water experiment.  I really wanted to sing,  "Come on do the circulation" the whole time. *Quick note, Steve Spangler's website says it takes 24 hours for the dye to show up, but it really needs more like 48. Also, all I could find at the time were yellow carnations.  We have run the experiment again with white carnations and had much more noticeable results.

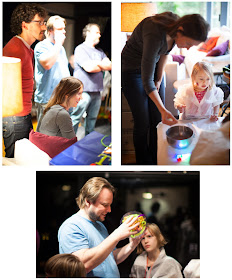
Even the grown-ups had fun with the experiments at our party!
     Even though as adults we're usually trying to teach our kids to always say thank you or at least say please, it seems there's a little room for scientific exploration even as grown ups (which makes me deliriously happy to see).

Gluten-free, Organic, Dye-free, Sugar-free food including watermelon water molecules!
     To put a little energy into their high-powered, revved-up body machines, I served a gluten-free, non-GMO, food coloring-free, sugar-free, mostly vegan spread.  Including watermelon water molecules.  I made melon balls with honeydew and watermelon and used halved toothpicks to hold them together.  (*Adult supervision required for the younger set...*)  You could do a similar, savory version with bocconcini cheese and cherry tomatoes.  We have lots of friends who are gluten and grain free, so this year I made a gluten-free, processed sugar-free cake from The Spunky Coconut.  It was incredibly moist and if you like coconut, you're going to love this cake!  I served my go-to chemical-free homemade soda again, this time with mango juice.  My favorite though, was the fruit juice and agar brain!
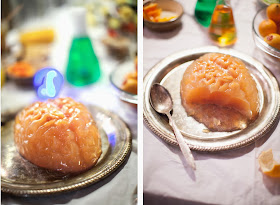
A fruit juice and agar brain, vegan, sugar and dye free, and perfect for a science or halloween party!
      I loved how firm and opaque this looked, it's vegetarian so I and my vegan friend can partake, and agar is what scientists use in petri dishes when they make cultures so I was triple geeked about this!

Vegan, Sugar-Free, Food Coloring-Free "Jello" Brain
4 1/2 tsp agar powder
6 cups unfiltered apple juice

In a pot, bring  juice just to a simmer (not boiling), then add agar. Stir well and bring to a boil, reduce the heat, and simmer, stirring often, for 5 minutes or until the agar has dissolved.  Pour "jello" into a lightly oiled brain mold (trust me on this, the standard gelatin mold release tricks won't work on agar).  Cover and chill about 2-4 hours or until set. 

(You can use any juice with this, and if you want to add a little sugar, honey, or agave you can, though I don't find it necessary.  If you want to add a little extra weirdness, float some fruit chunks in there!  Apparently kiwi and pineapple interfere with the set, so skip those.)

And remember...
It's never too early to learn and enjoy science!
As your body grows bigger, your mind must flower.  It's great to learn, because knowledge is power!!


He thinks this is what a mad scientist looks like...
Whether or not all that power turns you into an evil scientist is up to you... (Me thinks this one has more Doofenschmirtz than Frankenstein about him...)