Wednesday, March 27, 2013

Sometimes Things Just Don't Work Out...

You may remember last year's post in which I tried to find my friend Laura's cake, failed, and coincidentally our trip to Hawai'i was coming up and also Easter.  It's that time again.  It's almost Easter, we're on our way to Hawai'i, and I'm going through my recipe box looking for Laura's cake. 

I found another recipe that sounded about right, but the problem was that it used a boxed cake mix, instant pudding, and Cool Whip.  And you guys know that's not how I cook, right?  So I decided to make the whole thing from scratch. 


My poor pineapple had bed head...


 First time I ever opened a coconut.  It wasn't terribly hard, actually...

And this was the product.

 Isn't it gorgeous?!


 And it tasted?

 Absolutely.

 Disgusting.

The cake was perfect.  Genuinely wonderful.  The frosting was Spectacularly Awful.  I narrowed it down to the pineapple.  It tasted fine by itself, but somehow when it got mixed in with everything else it was bitter and... I'm just gunna say it... unholy.  It was unholy, people.

So I am giving you the original recipe.  That tastes good.  And not gross.  And I will tell you what I did in case you want to avoid whatever innocent mistake I made that went that horribly, horribly, horribly awry.  

Pineapple Cake
Yellow cake mix (prepare as directed on box)
1 pack (small) vanilla instant pudding
4 oz cream cheese
1/2 pint of half and half
1 can crushed pineapple (drained)
1 C shredded coconut
1/2 large container Cool Whip
Chopped walnuts

Combine pudding, cream cheese, half and half.  Mix till smooth on medium speed for about 2 minutes.  Fold pineapple, coconut and Cool Whip into pudding mix.  Frost cake.  Sprinkle with walnuts.

What I Did
The cake recipe is modified from the All-Purpose Buttery Yellow Layer Cake from The America's Test Kitchen Family Baking Book, pg. 280.

1/2 C Whole Milk, room temp.
4 large eggs, room temp.
2 tsp vanilla extract*
1 3/4 C (7 oz) cake flour (I used Bob's Red Mill PastryFlour)
1 1/2 C (10 1/2 oz) sugar*
2 tsp baking powder
3/4 tsp salt
16 Tbs (2 sticks) unsalted butter, cut into 16 pieces and softened
*I found vanilla sugar at the store.  I used 1 C sugar + 1/2 C vanilla sugar

1. Adjust an oven rack to the middle position and heat the oven to 350 degrees. Grease and flour two 8- or 9-inch round cake pans, then line the bottoms with parchment paper.  Whisk the milk, eggs, and vanilla together in a small bowl.

2. In a large bowl, whisk the flour, sugar, baking powder, and salt together.  Using an electric mixer on medium-low speed, beat the butter into the flour mixture, one piece at a time, about 30 seconds.  Continue to beat the mixture, one piece at a time, until it resembles moist crumbs, 1 to 3 minutes.

3. Beat in all but 1/2 C of the milk mixture, then increase the mixer speed to medium and beat the batter until smooth, light, and fluffy, 1 to 3 minutes.  Reduce the mixer speed to low and slowly beat in the remaining 1/2 C milk mixture until the batter looks slightly curdled, about 15 seconds.

4. Give the batter a final stir with a rubber spatula to make sure it is thoroughly combined.  Scrape the batter into the prepared pans, smooth the tops, and gently tap the pans on the counter to settle the batter.  Bake the cakes until a toothpick inserted in the center comes out with a few crumbs attached, 20 to 25 minutes, rotating the pans halfway through baking.

5.  Let the cakes cool in the pans for 10 minutes.  Run a small knife around the edge of the cakes, then flip them out onto a wire rack.  Peel off the parchment paper, flip the cakes right side up, and let cool completely before frosting, about 2 hours. 

This part is awesome.

Now for the rest of it:
1. To open the coconut, I used the heat and beat method I found here: http://www.wikihow.com/Open-a-Coconut though, I think the oven is supposed to be 400 degrees instead of 200 degrees.
I shredded it in the food processor using the shredding plate.  Then I toasted it in the oven following these directions.

2. I peeled and cored the pineapple and also shredded it using the shredding plate in the processor.  Then I drained it for a few seconds in the strainer.  There ended up being about 10 ounces.

3. I made the vanilla pudding recipe from my Valentine's post.  I used half of it.

4. I made whipped cream using 1/2 pint of whipping cream, three tsp agave nectar and 1/2 tsp vanilla.

5. And I used a brand of cream cheese that doesn't have any chemicals and junk in it.

And then I mixed it all up and somehow it tasted like earwax.  So there you go.  You tell me.

And you know what else?  It's still not Laura's cake...  I'm pretty sure this was one my Great Aunt Ophelia used to make.

But it was beautiful.

On the homeschool front this year, I used many of the same books from last year, but I also found two new story books for the kids.  Punia and the King of the Sharks a Hawaiian Folktale and Pig Boy: A Trickster Tale From Hawai'i.  Both of them were a hit with the boys!  Libraries are awesome, ya'll!

Friday, March 22, 2013

Well Now I've Seen Everything...

     Wednesday was the first day of Spring.  It was actually a nice day.  That was just crazy.

     Yesterday, in the time it took us to drive home from swimming lessons it rained, snowed, hailed, and the sun came out.  Then about 20 minutes after we got home a huge crack of thunder shook the house, made one of the kids cry and sent the cat running under the bed like a cartoon character.  You know when they can't quite get traction and run in place for a second?  Yeah.  That was crazy.


     Today, we woke up to snow on the ground.  More snow than we had all winter.  At one point, the snow had tapered off and had melted from the trees and I said, "Well boys, that looks like the end."  At which time it immediately started snowing fast and hard.  My youngest said, "See Mom?! You made the snow mad! It wants kids to have fun!!"  Crazy.


     So, what do you do on a crazy morning when your kids are cold and wet from playing in the snow?  And it's too early to start drinking?  Why serve oatmeal, of course! 


     The host of a local radio program, one of the most famous chefs in this area, was talking about oatmeal last week and how he didn't like it much because all they ever had in the house was instant oatmeal.   I was surprised by this because this is such a foodie area and he is a famous chef for pete's sake.  I realize in retrospect, he's probably a very busy man and his family is like all other families who don't have a lot of time in the morning.  It's much easier to nuke a bowl of slop in the microwave for a minute than to babysit a pot on the stove for 10.  But I must say, I find the outcome considerably more rewarding.  Especially when compared to the oatmeals with added sweeteners and flavors.  


Basic Apple Walnut Oatmeal 
4 Cups Water
3 Cups Rolled Oats Oatmeal (Not quick-cook or instant, my favorite is Snoqualmie Falls Lodge)
1/2 tsp salt
1 C peeled and cubed Apples
1 C roughly chopped Walnuts
1/2 tsp Cinnamon

Bring water and salt to boil on the stove.  Add apples, walnuts, oatmeal, and cinnamon and bring back to a boil.  Reduce heat to low and simmer for about 5 minutes until water is absorbed and oats are soft, but not too sloppy.  They should have a nice chew and the apples should not be completely soft. 


Notes:
Toppings: Sucanat or brown sugar for sprinkling, butter, and milk or vegan equivalents
Optional fruit: instead of apples, bananas, or raisins are other options, although I personally think raisins taste like sweet, warm slugs.  Almonds are a great alternative to walnuts.

Review:
This is perfect for Winter days and well... apparently Spring days, too...  It's not groundbreaking, but it's a whole lot better than something from a pouch.  Seriously, save those for camping.

What are your favorite ways to top oatmeal? 

Friday, March 15, 2013

Claiming Immunity...

     This has been a particularly bad year for germs in the Pacific Northwest.  The kids have been continually sick, their friends have been continually sick, and more importantly, I have been continually sick.  This just doesn't happen.  While it's true that I observe the holy pre-Christmas tradition known as Snotmas Eve, I rarely get sick the rest of winter.  I save my bouts of pneumonia for Summertime when it's pretty outside.  Like God intended. 


     This last cold was the straw that broke the camel's back.  It's my third of the season, the kid's fifth, and my husband's second.  The time had come to boost the immunity in this place.  So I sat on my couch with my tissues in my hand and my pocket and tucked into my cleavage and searched that mighty database of human knowledge known as the Internet for "immunity boosting foods."  And then I went to the store and bought All Of Them. 

The top contenders were:
  • yogurt
  • leafy greens, particularly spinach
  • broccoli
  • citrus fruits, particularly oranges
  • raw garlic
  • fish, beef, and chicken (particularly chicken soup)
  • black or green tea
  • orange foods like sweet potatoes, carrots, and winter squash
  • mushrooms, particularly Shiitake, maitake, and reishi
  • apples
  • oats
  • beans and lentils
  • nuts like almonds and cashews

     I didn't want to eat yogurt because it may or may not increase mucus production depending on who you listen to, so I bought probiotic capsules and also a vitamin D supplement since it is good for boosting immunity and it is well known that people in this area are deficient.  One of the main ways to get it through food is salmon, which of course, I don't eat.

     I set to work.  One night we had steamed sweet potatoes with kidney beans and steamed broccoli tossed with raw garlic.  We had oatmeal for breakfast.  And last night the meat eaters had salmon cakes with this salad.


Immunity Salad with Raw Spinach Garlic Dressing
Dressing:
1/2 C raw cashews
1/2 C water + 1/4 C water
1 carrot
1 C raw spinach
Juice of 1/2 meyer lemon, seeds removed
2 small cloves garlic*
1/4 tsp salt

Blend cashews and 1/2 C water in a blender until the cashews are completely liquified (about 1 minute or so).  Add remaining ingredients, using the extra water to help the blending process throughout.  If you want a thinner consistency, another 1/4 C of water would probably do it.

*Taste the strength of your garllc before adding the second clove, some varieties are stronger than others.  You might even want to add a third small clove, depending.

Salad
4 C raw kale pieces
1 large apple, cubed
1 large orange, segmented
1/4 C cashews toasted in a pan

Put all ingredients into a large bowl and toss to combine. 

Review:
     The boys are funny about salad.  My eldest loves kale all by itself so he was upset there was salad dressing on it.  My youngest loved the dressing and the kale, but didn't like the cashews and apples.  In the end, they both ate their entire salads for the promise of splitting the last salmon cake.  Here's to Health!  Oh!  And this just happens to be little green for St. Patrick's Day!  Happy Eatin' o' the Greens!

Resources:
Livestrong.com
Prevention.com
Eatingwell.com
Webmd.com

Friday, March 8, 2013

Mommy's Little Helpers...

     One of my favorite books as a kid was "We Help Mommy" and to a lesser extent, "We Help Daddy" by Jean Cushman, as illustrated by Eloise Wilkin (the best illustrator Little Golden Books ever had, in my opinion).


     "We Help Mommy" was probably my favorite because my Mom did most of the stuff in the Mommy book, but Dad didn't do much of the stuff in the Daddy book. 


    Washing the dog and trimming hedges just wasn't something people did in rural North Carolina.  My Daddy was busy digging the foundation to our addition by himself with a shovel, not smoking his pipe and painting fences! 


     But anyway... I loved the part of the We Help Mommy book where the little girl makes her Daddy a pie.  Even as a child it seemed so domestically delicious and 1950's perfect that she would know how to make pie and use the cherries to make a face. 


     I bought my kids a copy off Amazon just so I could read them this book for Reading Week.  There is a large portion of the book that I don't do.  Nobody in my house uses place mats, for starters.  But it is an encouragement to kids, I think, to see what they are capable of and a reminder for parents, too (or at least me) of all the little ways kids can help out around the house.  "We Help Daddy" is on its way too, but there isn't much in there about playing iPad and breaking down boxes in the garage... 


     Fortunately, in our rough approximation of 2013 perfection, there is lots of room for pie.


We Help Mommy Individual Cherry Pies
Pie Crust Recipe from Mark Bittman's How to Cook Everything Vegetarian, pg. 866.  Method, mine.

1C plus 2 Tbs all purpose flour, plus more for rolling
1/2 tsp salt
1 tsp sugar
8 Tbs (1 stick) cold unsalted butter, cut into about 8 pieces
3 Tbs ice water, plus more if necessary
1 can pitted cherries in syrup

Place dry ingredients into a bowl of a food processor fitted with the dough blade, if you have one.  Pulse four or five times to combine.  Add the butter one piece at a time, pulsing in between.  Once all butter has been introduced, run the processor until crumbs begin to form.  Add ice water one tablespoon at a time and run the processor until a ball forms (about 2 minutes).  Add more water if necessary to form a cohesive ball that's not too wet.

Roll dough on a well floured surface to about 1/4 inch thickness and cut to desired shapes.  Place dough into floured press, fill, and close to seal edges.  Bake on a parchment lined baking sheet at 350° for 25-35 minutes.

Notes:
You can refrigerate the dough for an hour if you have time, I just went ahead and let the boys roll these out.  The Pie Mold is made by Tovolo, but for the life of me, I can't remember where I got it.  I think I found it on sale somewhere.  It's a great little press that works well for savory as well as sweet pies with good crust/filling ratios.  Wilton, Progressive, and Norpro also make similar molds.  The pie crust recipe made exactly enough for four personal pies with just a tiny bit left over.

I was going to use cherries I'd canned myself a couple of years ago in these pies, but it seems two year old cherries smell a bit fermented.  I didn't want to take a chance at any rate, so I used these cherries by Oregon brand.  I like that brand for storebought fruit if I must use it because there's really nothing in it except fruit and sugar water.  This can filled these pies just right.  I didn't add anything else to the filling, but a little cinnamon would be a nice touch if you like.

Review:
I made the boys wait until after dinner to have these and they nearly died waiting.  The good news is it was totally worth the wait! 

Thursday, March 7, 2013

Who Will Help Me Make the Bread?

     Ahhh... The Little Red Hen.  The age-old tale of hard work, determination, and comeuppance.   And wheat multiplication of Biblical proportions.  But it's a shame the other animals wouldn't help that sassy little hen.  They missed out on an authentic farm to table experience! 


     My youngest helped me today, not because my eldest said "Not I," however.  Poor guy was sleeping off a fever.


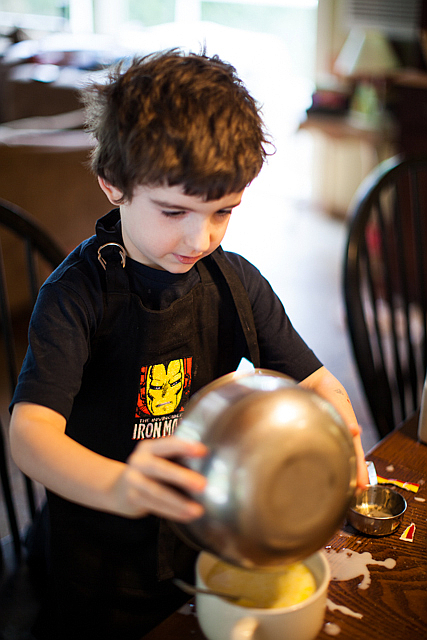
     I used my Mom's bread recipe to make rolls.  I substituted honey for the sugar and it was great!


Iron Man takes baking very seriously. 


     I made the recipe as usual, subbed honey for the 1/2 C brown sugar and after the punch down, I divided the dough into 16 pieces.  For the second rise, I put them in a deep dish pizza pan.  It's OK if they touch a little bit.  I cooked them for 10 minutes at 375° and then about 45 at 350°.

     These are especially good with Chicken Soup with Rice!

Wednesday, March 6, 2013

Whoopy once, whoopy twice...

     Whoopy Chicken Soup with Rice!  Maurice Sendak is my husband's favorite children's book illustrator and my boys love him, too.  Who doesn't dream of following Max to the land of the wild things or soaring around naked in a Night Kitchen?  But one of his most delicious titles has to be Chicken Soup with Rice.  A handy primer for teaching months of the year, it has the subliminal effect of making one desperately need a bowl of soup by the end.  But not just any soup, mind you!  Chicken Soup with Rice.


     I made this lovely little thing in the pressure cooker.  The advantage of this is that to make the stock, one processes it for 15 minutes*.  Drain out the bones, pop in some veggies and rice and process for 4 minutes*.  That's right FOUR minutes.  And then, my friends you've got soup that tastes like it's been simmering all day.  I love the pressure cooker for soup!

*Times do not include the time it takes to bring the pot to pressure.  It still takes under an hour to make this stock and all, though.

Quick Chicken Soup with Rice
 (Yields 6-8 servings)

For the Stock:
1 Chicken carcass, picked pretty clean
1 Onion, halved and peeled
2 cloves of Garlic, peeled

Place the carcass in the crock pot and submerge it in enough water to cover it.  Water should not come above half way up the side of the pot.  Add the onion and garlic.  Put the lid on the pot and make sure the weight is on.  Heat on high until the weight starts to jiggle.  Reduce heat to low so that the weight jiggles slowly.  Cook for 15 minutes.  At the end of that time, run cold water over the lid of the pressure cooker (not the valve) to release the pressure and open the lid.  (Consult your cooker's instruction manual for additional quick pressure release methods your cooker may have.)  Put a strainer over a large bowl and drain the carcass and vegetables out of the stock.  The onion should be extremely soft.  If you want, you can put the stock in the fridge and let it cool. It will be really easy to skim the fat off when it hardens.  (Clearly, I didn't bother with this step tonight.)  You can freeze the stock for later if you want or can it following chicken soup processing times.

For the Soup:
2 Carrots, sliced
1 stalk Celery, sliced
1 Onion, chopped
2 cloves Garlic, diced
1 C white Long Grain Rice, rinsed (Basmati is nice)
1 C cooked Chicken pieces
1 Tbs Thyme
Salt and Pepper to taste

Return the stock to the pressure cooker.  Add water as necessary to bring the level to half way up the cooker.  Add veggies, thyme, chicken, and rice.  Close the lid and add the weight.  Heat on high until weight jiggles.  Reduce heat until weight jiggles slowly.  Cook for 4 minutes.  Remove from heat and reduce pressure quickly by running water over the lid or whatever quick release methods your cooker has. Adjust seasonings as desired.

Review:
My youngest son LOVED it!  He said, "Mom!  I'm the little boy in the book!"  Unfortunately, my eldest has a cold and slept through dinner, but I'm sure he'll be all over this at lunch tomorrow!

Tuesday, March 5, 2013

I Hope You're Very Hungry!

     My boys simply love the book The Very Hungry Caterpillar.  Something about that chubby little guy munching his way through life hits home with them.  Perhaps because, like him, they love a good fruit salad...


     There are lots of fruit salad recipes out there for the Very Hungary Caterpillar, including one on the Eric Carle website, but most of them miss one of the tastiest fruits in the book!  The watermelon!  This simple salad has watermelon mint dressing which really punches up the whole shebang.  


The Very Hungry Caterpillar Fruit Salad
(Serves 4 or one very hungry bug)
1 plum, cubed
1 orange, segmented and cubed
4 strawberries, cubed
1 pear, cubed
1 apple, cubed
1 C watermelon chunks
15-20 mint leaves

Blend the watermelon and the mint in a blender for about a minute until the melon is liquified and the mint is chopped very small.  Combine remainder of the fruit and drizzle with the dressing as desired.

Notes:
You will find that this recipe does not use the quantities mentioned in the book, feel free to use 1 Apple, 2 Pears, 3 Plums, 4 Strawberries, 5 Oranges, and a slice of watermelon if you like, but I felt it was a bit much for my boy's breakfast...

Review:
Huge hit!  They knew immediately it was from the book without me even having to tell them!  I bet your little bugs will love a chance to chow on this, too!

The Chicken Chick
Find this post at the Clever Chicks blog hop!

Monday, March 4, 2013

Reading Week!

When my oldest was two, The Tawny Scrawny Lion was his very favorite book.  My husband and I knew the book by heart.  *Spoiler Alert!  The Tawny Scrawny Lion starts out thin because he has to work too hard to eat meat so he meets a rabbit who feeds him carrot stew and becomes fat and happy The End.  

This book lists the ingredients for the rabbit's carrot stew including:
Carrots
Mushrooms
Good-Smelling Herbs
Fish

Don't ask me why the rabbit family eats fish.  Perhaps they're pescetarians.  

When my son was little I wanted to make the stew for him, but I couldn't bring myself to put fish in it until I thought of Goldfish crackers!  It's been a hit ever since.

March is reading month apparently, and I have been wanting to share some homeschool/preschool recipes with you guys.  What better way than to start with a week's worth of food based on children's books?


Tawny Scrawny Lion Carrot Stew

1 medium onion, chopped
2 cloves garlic
1 (4-5 oz) chopped portobello mushroom (gills removed)
2 lbs carrots, peeled and sliced
5 C water
1/2 tsp fresh rosemary leaves, diced
1 tsp fresh thyme leaves
Salt and Pepper to taste
Olive oil

Heat a little olive oil in a large pot, then add the onion and cook until it is transparent.  Add the garlic and cook until the scent blooms (about 30-50 seconds).  Add the mushrooms.  Cook until the mushrooms release their juices.  Add water, carrots and herbs and bring to a boil.  Reduce heat to a simmer and cook until carrots are soft.  When the carrots are cooked, use an immersion blender to puree the soup.  Serve with fishy crackers and berries for dessert!

 Review:
 My guys love this soup! 

Related Posts Plugin for WordPress, Blogger...