Monday, September 26, 2011

Boldly Going Where No Chocolate Pie Has Gone Before!

     My food blogger friend, Chinmayie, from over at LoveFoodEat created a luscious chocolate mousse pie with a secret ingredient.  Listen up, folks, I'm about to spill the beans... It's beets!  I made it a few weeks ago and discovered how super easy and super yummy it is.  You would never know there were beets in it.  Don't get me wrong, I can go to town on some beets.   Roasted, they're one of my favorite vegetables.  But this pie, it's just pure, smooth, chocolate yum all in your mouth.  The beets are purely for texture.  The crust is very simple, just 5 ingredients, so when I found gluten-free hazelnut flour at my farmer's market, this pie sprang to mind immediately.   I finally made it last week when I had a friend over for dinner who is eating a gluten-free diet.  I was surprised how well this converted!  Chinmayie was kind enough to allow me to re-blog her recipe with my updates. I also converted my cornbread recipe, and I'll be posting that soon!

But for right now...


Gather your ingredients, cuz it's Pie Time!!  *Squeeee!*

For the crust:
    * 1 cup hazelnut flour
    * 2 tbsp cocoa powder
    * 4 tbsp sugar (I used Sucanat)
    * ¼ cup coconut oil
    * 3-5 tbsp cold water


Grease a pie pan with coconut oil.  If your coconut oil is liquid, first place it in the freezer/refrigerator till solidifies (mine is always solid except on the very hottest days). Mix the flour, cocoa powder, and sugar until combined, then incorporate the coconut oil slowly with your fingers. When it resembles bread crumbs, add enough cold water to make dough.  Press it into a pie pan with your fingers as you would a graham cracker crust.  Bake at 410°F for 8-10 minutes or till firm. Let it cool completely.

 
 For the mousse:
    * 1 cup semi-sweet chocolate
    * 1 large beet (or 2 medium size)


Peel and cube beet.  Cover with water and boil till soft, then drain and blend into a smooth purée. Melt the chocolate, using a double boiler, till smooth. Turn off the heat and let it cool for a few minutes. Now add 1/2 C of the beet purée and mix well. Pour this chocolate/beet mixture into the prepared pie crust and smooth the surface with a spoon.  Refrigerate overnight.  Whereas, the regular wheat crust version of this pie is ready in a couple of hours, this pie really needs to sit overnight in the fridge.  It helps the crust release from the pan a little easier.  Another thing that might help in this regard is to dust the pan with a little gluten-free flour after greasing it, but I haven't tried this.

Notes:
In the filling, I used 1/2 C Scharffen Berger 70% Cacao Baking Chunks and 1/2 C 62%.  I have also used plain old grocery store generic semi-sweet chocolate chips, which work just as well or better.

Review:
You don't want to miss this one, friends!  Thank you, Chinmayie, for sharing this recipe and allowing me to adulterate it shamelessly.  For those of you who aren't gluten-free, try her original recipe.  You won't be disappointed!

Tuesday, September 20, 2011

Dinner by Chance...


I recently had a serendipitous congruence of leftovers.  (Whew!  Dragged out the $5 words for that one!)  Not long ago, I spent a large portion of a two days putting up tomatoes.  It just so happens to have been the same week I made the quinoa kale wraps.  I ended up with a few large tomatoes that I had broiled for canning, but didn't have enough to make a whole jar.  I wasn't sure what to do with them till I scrounged around and found the leftover lentils and quinoa and I also had some baby bella mushrooms.  A wonder was born.  Can I just say how much I love this?

The tomatoes are barely cooked, paired with fresh basil and roast vegetables.  Mix in a little quinoa and french lentils?  It's just wonderful...

Start with a few demure ingredients...  I used chanterelle mushrooms this time and French lentils.  I will forever be indebted to my friend Matt who introduced me to French lentils...  They hold their shape so much better than regular green or brown lentils.  Also, I really liked the earthiness of the chanterelles in this tonight, though the baby bellas were nice, too.  (P.S. I grew that basil!)

Cut X's in the bottoms of your tomatoes.  Remove stems, and place them on a roasting pan with the X's up.

 
Place vegetables in the center of a roasting pan with a little olive oil drizzled over top.

Roast veggies at 450° for 10-15 minutes until garlic is soft.  Remove herbs after roasting.

Broil tomatoes.  Once tomato skins blacken slightly and crack, remove from oven and let cool until you can handle them enough to remove skins. 

Chop tomatoes, mix with vegetables, warmed quinoa and lentils.  Garnish with chopped basil, and serve!

Roast Vegetables with Quinoa and Lentils
5 medium or 2 large tomatoes
1-2 C leftover quinoa cooked with veggie bullion
1-2 C leftover lentils
5-6 cloves garlic, in skins
1 medium onion, cut into 8 chunks
1 sprig fresh rosemary
4 sprigs fresh thyme
1 C whole baby bella, white, or chantrelle mushrooms
1 stem fresh basil, chopped
olive oil

Place garlic, onion, and mushrooms on pan, drizzle with oil.  Place rosemary and thyme sprigs on top of mound.  Bake at 450° for 10-15 minutes, until garlic is soft.  Remove from oven.  Switch oven to "Broil" and place tomatoes on top rack.  Broil tomatoes until skins begin to crack and blacken, between 5 and 10 minutes.  Remove from oven and let cool.  Meanwhile, reheat quinoa and lentils in a pan or the microwave.  Once roast vegetables have cooled slightly, squeeze garlic from paper shell and discard shell.  Peel tomatoes and chop, roughly.  Combine quinoa, lentils, tomatoes, garlic, and onion blend, top with basil.  Serve warm or cold. 

Salt and pepper as you wish, though I find it unnecessary.

For instructions on cooking the quinoa and lentils from scratch, see my previous post.


Review:
The nearly raw tomatoes and the fresh basil make this very "new" tasting, while the mushrooms and roasted garlic really mellow it out.  Quinoa is my favorite grain so I am always happy to find new uses for it.  The Littles will eat everything but the onions, which is great because there's so much healthy stuff going on here!  It is one of the few dishes that really is good warm, room temp, or cold.  Hope you enjoy this as much as we do!

Monday, September 19, 2011

Quick Tip on Making Mayo

I've been making my own mayonnaise nearly a year now.  I tried it in the food processor, but got mixed results and graduated to the blender, but I hated what a huge mess it made.  A few months ago, my friend Monte showed me a new technique that he apparently learned from an infomercial.  Who says you never learn anything from tv?

My recipe is
1 egg
1/2 tsp salt
1 Tbs white vinegar
1 C vegetable oil

This is the same technique I used to make the aioli for my puka dogs.


(Sorry about the radio in the background... duh...)

I have made it with lemon juice in place of the vinegar, but I like the flavor better and it keeps longer with the vinegar.

Some recipes suggest bringing everything to room temp, but I haven't found that to be necessary for this technique.  Possibly if you were beating this all by hand, you might need to.  This will keep several weeks in the fridge and yields about 1 1 /2 Cups of mayo.

Good luck and happy mayonnaise!

Thursday, September 15, 2011

Summer is Almost Over...


But before it disappears altogether, I'd like to introduce you to a little tropical awesomeness.  If you've ever been to Po'ipu or Waikiki, HI, you have probably heard of the world famous Puka Dog.  If you've ever eaten one, you know you want to eat another one (or five).  And well, unless you live in Hawai'i it's not easy.  If you haven't eaten one (or five), you can make this reasonable facsimile at home to whet your appetite.

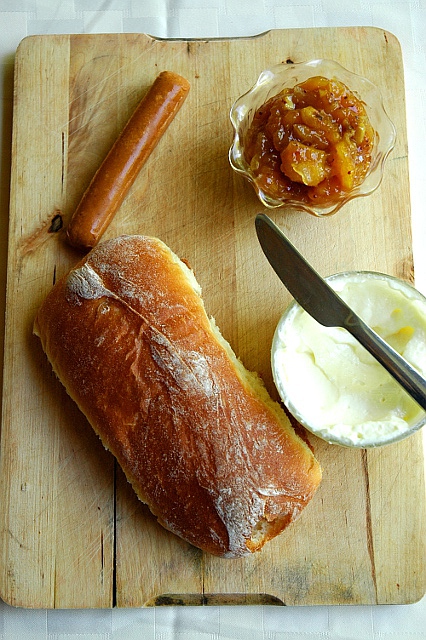
"Puka" means "hole" in Hawaiian so a Puka Dog is a bun with a hole poked in it, filled with special garlic sauce, your choice of fruit relish, and either a vegetarian hot dog or polish sausage.  The one I tried (and then decided to make) is mango chutney and aioli.  Make this, marvel at the wise Hawiians who know exactly how to treat a hot dog properly, then resolve to visit as soon as possible to have one of these for your very own!  Or you know, have five, I won't judge...

I got the recipe for the Hawaiian sweet bread from allrecipes.  The recipe for the chutney, which I altered slightly, came from simplyrecipes.  The aioli is a very simple mayo that I added a ton of garlic to.  Let me just say, you may never eat another condiment again.  Holy cats.

This looks like a lot of work.  But once you've got the chutney and aioli made, they're good for several weeks in the fridge so you can use them again and again.  And you will want to.  Oh my yes.  You will want to...

Start with the bread as it needs time to stir up and also to rise.

Bread Machine Hawaiian Sweet Bread
    * 1 cup warm water
    * 1/4 teaspoon vanilla extract
    * 1/4 teaspoon lemon extract
    * 2 eggs
    * 4 tablespoons margarine
    * 5 tablespoons white sugar
    * 3 cups all-purpose flour
    * 3/4 teaspoon salt
    * 2 tablespoons dry milk powder
    * 2 tablespoons dry potato flakes
    * 1 tablespoon active dry yeast


Add ingredients to your bread machine as the manufacturer's directions suggest.  Set your machine to the dough setting.  When your machine is done working its magic, divide dough into 8 sections and roll into "bun" shaped loaves.  Set in a warm, draft-free spot to rise about an hour and a half until not quite doubled.  Bake at 350° for about 30 minutes, or until bread is nicely browned and when you thump the crust, it sounds hollow.

Notes:
Next time I'm adding 3-5 more Tbs sugar.  As is, this is very good,  nay, exceptionally good bread, but not quite as sweet as Hawaiian sweet bread.  Also, I haven't tried it, but I imagine that this would freeze pretty well so if you wanted to make this well in advance, you could.


I did the chutney next as it required some cooking.

Mango Chutney
    * 2/3 cups sugar
    * 1/3 cup distilled white vinegar
    * 2 large mangoes peeled and cut in 3/4-inch pieces
    * 1/2 medium onion, chopped
    * 1/4 cup golden raisins
    *  1 tsp minced fresh ginger
    * 1 garlic clove, minced
    * 1 teaspoon mustard seeds, whole
    * pinch teaspoon red chili pepper flakes (hot)

Combine sugar and vinegar in a pot.  Bring to a boil, stirring until sugar dissolves.  Add remaining ingredients and simmer uncovered until syrupy and slightly thickened, 30 to 45 minutes. Stir occasionally during cooking.  Keep refrigerated in airtight container.

Tip:
For an interesting way to use up chutney, try it on pancakes!  I used my basic pancake recipe, substituted coconut oil for the oil, added coconut oil to the cooking pan for extra measure, and tossed in a banana and 1/4 C hazelnuts.  Macadamia nuts would be a great way to embellish, also.  You won't be disappointed!

Garlic Mayo (Aioli)
    * 1 cup vegetable oil
    * 1 egg
    * 1 tablespoon lemon juice
    * scant 1/2 teaspoon salt
    * 6 garlic cloves pulverized into a paste

  
Ever since my friend Monte told me how, I've used an immersion blender to make my mayo.  Put the egg, lemon juice, salt, and garlic paste into whatever vessel you're using to make the mayo in.  I recommend something with tall sides like a glass.   Buzz it a tad with the blender to combine.  Pour the oil on top of that.  Insert your blender again.  Starting at the bottom, turn the blender on, and slowly draw it up through the oil.  Watch the mayo appear before your very eyes.  If you have a little oil left at the top, just run the blender up and down through the mixture a few times to incorporate. Store in an airtight container in the fridge. 

Assembly:
Take your beautiful, beautiful bun:


 Poke your beautiful, beautiful puka:

 
This is an apple corer, but you can use a knife.

Slather the inside with your beautiful, beautiful chutney and aioli:

 You may say, "My goodness!  Isn't that a lot of bread?!"
And the answers is, "Yes, yes it is."
But the real question is, "Does it matter?"
And the answer is, "No, no it does not!"

Insert your veggie dog/polish sausage/100% all beef frank.


You may also say, "My goodness!  What happened to that poor hot dog?"
To which I reply, "Sorry, it's a microwaved veggie dog.  Not the best for photography, but it tastes great anyway." 

Review:
I think I'll call these "Haole Holes."  They're not quite the same as the real thing, but oh so tropical and oh so delicious!  These dogs go to 11!

Thursday, September 8, 2011

Props

I am constantly bragging about my Farmer's Market and showing you produce I have bought from there, not to mention using it in recipes.  I thought you might like a peek at some of the people who make up my market.  I go to the Lake Forest Park Commons market on Sundays.  It's not the biggest market, but it is wholly dedicated to fresh, local produce without any "frills."  I was recently disappointed by another local market that was almost entirely made up of crafts vendors.  Nothing against craft vendors, my Dad made a living doing shows when I was growing up and I've even done a show myself.  But when I go to a market, I want kolaches, not tchotchkes, if you get my drift.  LFP market has one craft day a year.  It's awesome.  There are a lot of talented people in this area.  And this year, as part of the city's anniversary celebration they even had a carnival.  Including a "clean up after your dog" booth that involved throwing felt "poo" in a trash bin.  o.O  

None of that takes away from how awesome this market is.

 Let's start where I always start, Blue Cottage Jams.  Now, let me just say, these ladies have some fine jam.  Including tayberry, which I am going to hook my little self up with next week.  But the reason I hit them first every week is because they sell Biocento eggs.  Biocento treats their animals right.  I met them at a market in Bellevue a few years ago and when I found out LFP had a market I was so excited to find these guys carried their eggs.  They actually let their chickens eat grass and bugs!  Who'da thunk it?  Healthy chickens make healthy eggs.  And everybody knows it, you gotta get there pretty early to get your hands on a dozen of these babies!

Another one of the first places I hit is Garden Treasures.  Suji, here, puts up with a lot of my craziness.  20 pounds of cucumbers?  OK.  40 pounds of tomatoes?  Sure.  Baby corn?  I'll check.  Picture for the blog?  No problem!  *sigh...*  I like people who put up with my crazy...  These guys have everything.  On this visit, I bought turnips, a cucumber, tomatoes, a huge shallot and my beloved purslane.  They are one of the many stands that offer a CSA.  I am seriously considering this next year.

 Five Acre Farm is another of the produce stands I visit regularly.  I just love the heck out of this lady.  Isn't she the cutest thing?  They've got really great salad mixes that the boys love because there are flowers in it!  Super high quality, and it's not easy on hot days to keep lettuce from looking like it's been run over.  I got some rockin' cauliflower here last week.  I roasted it in the oven last night with some Brussels sprouts, onions, garlic, and some potatoes I actually managed to grow myself.  Talk about yum!

One of the boy's favorite new stands is Aldrich Farm.  Because they stand there and hand out samples like it's going out of style.  And you bet these boys can eat jam samples like it's going out of style, too!  We bought some great mustard from them a couple of weeks ago, and this time I bought Apple Pie flavored jam.  Thumbprint cookies, here we come...  Plus, look at this: 

You know I'm a sucker for sprinkles.  Isn't that gorgeous?!

Maharlika Farm is great.  They carry a lot of Asian specialties like bitter melon and my new obsession:

Chinese Okra.  Holy nom, Batman.  This kind lady taught me how to eat it.  Trim off the ribs, cube it, sauté it with onions and garlic and stir in an egg.  Sometimes I add some mushrooms, too.  Dude.  Flavor wise, it's a lot like zucchini, but it retains a crunch like peppers do.  It's not slimy at all.  Great, light start to the day.  Tonight we tried it on the grill.  The inside was wonderful, sweet and juicy.  The outside kinda tasted like dirt.  Next time, maybe we'll peel it and put it in some sort of veggie mix...  And I never would have known, if it weren't for this sweet lady from Wapato, WA!

I visit  Alvarez Farms because they have dried beans.  I love dried beans.  No greater way to get protein into a vegetarian.  And they always have a few interesting varieties.  They also sell peanuts.  You know this Southern girl loves her some peanuts!  This family has been at it a long time.  You can read more of their inspiring story here.

My eldest son loves the soup booth.  During the early parts of the season, Got Soup? offers warm, rich soups and during the dog days they serve up cold soup samples like Heirloom Tomato Gazpacho, and Potato Vichysoisse.  They even have dessert soup like White Peach and Apricot Gazpacho.  C'mon now!  You know you want to eat that!   And quite frankly, their Wild Mushroom Soup may be the best thing I've ever put in my mouth, and I told Jerry Baxter (the owner) that once in an e-mail.  He said he had one in the freezer if I wanted it.  That baby was all mine the next week.  Nobody got a bite.  Mine, I tell you!  My precious!  Sssssoooup!!

*ahem...*


Gradwhol's Farm. What can I say?  I'm a vegetarian.  And this is where I buy my beef.  They are very local, Covington, WA, they treat their animals properly, and my husband says you can tell.  I usually buy ground beef when it's time for a burger and all my boys love them!  Plus, look at these guys.  Don't they just look like the nicest people on the planet?  She's a blogger and I forgot to write down the name of her blog so I can't post it here (duh) but if she contacts me I will share it! *UPDATE!*  It's called The Little Road Said Go! and it's super cute.

Another ingredient that features heavily into my recipes here is hazelnuts.  Specifically, DuChilly hazelnuts.  Specifically, DuChilly hazelnuts from Holmquist Hazelnut Orchards.  We met the owner last year peddling his wares and he talked us into trying some of the raw nuts.  I have never looked back.  And I've never bought another store-bought hazelnut.  These things are fantastic.  They sell some coated in candy flavorings like "Lemon Honey" and "Orange Honey", some with salty flavors like "Ranch Dressing" and, well, "Salt" and while my kids are partial to the candy ones (of course) hubby and I far prefer the plain ol' "Natural" nuts.  I bought a bag of their gluten free hazelnut flour a few weeks ago, but haven't worked up the courage to use it yet.  But I do have a certain chocolate pie recipe ruminating... (Hi, Chinmayie!)

Another booth new to our market this year, is Lilli Pilli.   Rhiannon, the owner/baker/macaron maker extraordinaire is constantly trying out new flavors made with in-season, local ingredients.  I think my favorite one is the Bittersweet Chocolate Ganache, though she did have a lavender one a few weeks ago that was beyond the pale.  

 She says she's not photogenic.  Whatever, lady.  =)


 When the boys are not scarfing down Lilli Pilli cookies, they are begging me for Whidbey Island Ice Cream.  Can I just say hand-dipped and hand-made?  No dies, no artificial flavors, no rBST?  I'm all over that.  Youngest always gets "Vanilla from the inside, and chocolate from the outside," Oldest likes chocolate with chocolate, and Me?  I like Raspberry.  Hello.  They sell it by the pint, too, but I just can't do that to myself!  I'd have ice cream headache for a week!

Speed Racer super-loves Vanilla from the Inside, too.

Sidhu Farms has berries.  Lots, and lots of berries.  I don't buy here every week, but when I do, I am never disappointed.  These berries went into a no-sugar jam recipe this week.  I have made so much jam this summer and I don't care!  I had to have these babies!

There are so many other wonderful farms and products at my market.  But I thought these guys deserved a special introduction since their produce has formed many of the recipes on this blog.  And the desserts have helped to "form" me!  The only vendor I haven't mentioned here that I have in the past, is my forager Pacific Crest Foraging.  He hasn't been at the market for a couple of weeks, so he's either on vacation or having a slow period.  But he normally supplies us with a steady diet of morels, sea beans, tea and later on in the year, chanterelles.  Maybe one of these days, I'll get his photo up here, too.


I hope this post has encouraged you to scope out your local farmer's market if you haven't already.  And if you live near Lake Forest Park, you gotta check out this market!  Did I mention they have cheese?  Um... yeah... and fish, and dip, and pickles, and lavender, and plants, and once a month you can adopt a cat.  And they have barbecue sauce, and live musicians, and ooh!  Patty Pan Grill!  Changed the way I make quesadillas... And roses, and people bring their dogs, and you can use food stamps... and... and... and... just come already!  And if you simply can't bring yourself to schlep all the way to Lake Forest Park on Sundays, a lot of these guys are at the Bellevue Farmer's Market on Thursday and/or Saturday.  I used to go to this market before the traffic got to me and I had a meltdown...  My head went all 'splody.  It wasn't pretty.  Go to your markets, people.  Support your local farmers.  You'll get fed, they'll live to farm another day.  It's a win/win!

Try not to let your head get all 'splody, though.  People will look at you like you're crazy...

Sunday, September 4, 2011

Tipping the Upside-Down Cake On Its Head

Figuratively, of course... 'cuz then it'd be right side up... or something...


OK, first of all, plums are pretty.


So very preeeetty...

Second of all, they're in season.  Third of all, I had this upside-down plum cake recipe calling my name.  I downloaded this recipe years ago.  Not sure where from.  There are a lot like it floating around out there.  So I decided to punch it up a little.

And now begins the story of the mascarpone cheese. I bought some this week.  I saw it in the store.  It said, "Hey lookit!  I'm mascarpone cheese!"  And I said, "I shall buy you, mascarpone and bring you home and eat you.  What do you taste like anyway?"  So I brought it home, opened it up, and lo it tasted like the creamy love child of crème fraîche and sweat socks.  Those mascarpone lovers out there.  I'm sorry.  It wasn't what I was expecting by a long shot.  So I resolved to use it up in the least offensive way possible.  Adding it to the cake batter was an interesting test.  Then I added the thyme.  And then, O Frabjous Day!  I learned you could add sugar to mascarpone.  Oh.  My.  Stars.  It might be the best frosting ever.  Mascarpone, I'm sorry I ever doubted you.  Please say you'll be my friend and frost my cakes forevermore.  And we shall live pudgily happily ever after.


Plum Poppy seed Upside-down Cake with Thyme and Mascarpone

    * 1/2 cup plus 2 Tbs. unsalted butter, softened
    * 1/2 C mascarpone cheese
    * 6 fresh purple plums, pitted, and each cut into 6 wedges
    * 1-1/3 cups sugar
    * 2 large eggs, separated, at room temperature
    * 1 tsp. vanilla extract
    * 1-1/2 cups all purpose flour
    * 1 tsp. baking powder
    * 1/2 tsp. salt
    * 1 Tbs. poppy seeds
    * 1/4 cup milk
    * 1 sprig thyme, chopped plus extra for garnish

1) Butter a 9x2 inch round cake pan, then dust with flour and tap out excess.
2) Heat 2 Tbs. butter in a heavy nonstick skillet over medium high heat.
3) Add plums and 1/2 cup sugar. Cook about 5 minutes, stirring occasionally until plums are just tender and sugar is completely melted.
4) Transfer fruit to a plate using a slotted spoon.
5) Reserve syrup in skillet, and let cool slightly.
6) Arrange plums, cut sides down, along bottom of prepared pan in concentric circles.
7) Boil reserved fruit syrup in skillet about 1 minute, stirring constantly, until slightly thickened. Pour syrup over plums, sprinkle with chopped thyme, and let cool completely.


8) Preheat oven to 350°.
9) Beat together remaining 1/2 cup butter, mascarpone, and 3/4 cup of remaining sugar in a bowl with an electric mixer until light and fluffy, about 2 minutes.
10) Add egg yolks, 1 at a time, beating well after each addition. Beat in vanilla.
11) Sift together flour, baking powder and salt in a bowl. Stir in poppy seeds.
12) With mixer on low speed, alternately add flour mixture and milk to butter mixture, beginning and ending with flour, and beat until just blended.
13) Using clean beaters and bowl, beat egg whites with an electric mixer on medium speed until soft peaks form.
14) Gradually beat in remaining 2 Tbs. sugar and continue to beat to stiff peaks.
15) Using a rubber spatula, gently fold 1/3 of whites into cake batter. Then fold in remaining whites just until blended.
16) Spread batter evenly over plums in prepared pan.
17) Bake 40-55 minutes at 350°, or until a tester inserted in center comes out clean.
18) Let cake cool completely in pan. Run a small knife around edge of pan, then invert cake onto a serving plate.


Mascarpone topping:
1/4 C mascarpone cheese
1/4 C powdered sugar
1/4 tsp vanilla extract
Mix it all together until it's homogeneous.  Eat it and don't stop until it's all gone!  Nom!  Or, you know, put it on the cake.  Whatever.

Garnish with additional fresh thyme.  (Don't skip this, it really adds a lot to the end flavor!)

Review:
Better on the second day, this one is a great make-ahead candidate.  Also, you know how much I like almond flavoring.  I may be testing that out next time in place of the vanilla in the cake and maybe the topping, too.  I'm keeping this.  It makes me happy...
Related Posts Plugin for WordPress, Blogger...