
I love my bread machine. Like, love it, love it. It makes me pizza dough. It makes me garlic bread. It's even been known to deliver unto me a banana bread or two. But no matter how hard it works, it will never be able to make my Mom's bread. It takes real elbow grease and determination to make this lovely stuff. You just can't compare the final outcome. Because this recipe takes so long between all the rising and the punching and the baking, I'm giving it to you today. The bread freezes great, so make it, freeze it, and thaw it out the night before Thanksgiving. (It also makes two loaves so you can snarf one as soon as it comes out of the oven!)
This is my Mom's recipe. She invented it so there are a few quirky little things in there she did more out of superstition than anything else. For example, to proof her yeast, she used sugar and flour. You really only need one or the other. But she wanted to make absolutely certain that hers would rise! I do it her way because she taught me, and I'm a sucker for tradition, superfluous as it may be... Also, at the time she gave me this recipe, she was enamoured with PAM Cooking Spray. You'll see it referenced several times. When I make it, I use a good olive oil in a pump sprayer, brush melted butter over it, or just omit the step all together, like I did today. This recipe is peppered with instructions as Mom was dictating and explaining at the same time over the phone. I removed some and put them in a glossary section at the end so the recipe wouldn't take forever to read for those of you who actually know how to bake bread.
Grammie's Whole Wheat Bread
2 packs active dry yeast (to find the freshest possible, sometimes you have to flip through to the back of the display)
1/2 C water (boil and let cool)
1 tsp white sugar
1 tsp white flour
Put water, sugar, and flour in a bowl. Stir till dissolved. Put finger into mixture and count to 5. When almost burns at 5, add yeast and stir (temp will be between 100°-110° for those of you who are sticklers for science). Will foam if working. Foam about 10 minutes in a draft-free spot. Don't stir any more.
Scald 2 C milk (Milk starts to steam, but before it boils)
1/2 C brown sugar
3 Tbs margerine (I use butter)
3 tsp salt
Add milk to margerine, sugar, and salt. Mix. Cool milk mixture to same temp as yeast. (Stick your finger in it if you want or use the thermometer again.)
3 C whole wheat flour
1 C bread flour (all purpose OK)
Add to milk mixture. Mix very well. Will be pretty thick. Add yeast. Mix. Add one or more "optional" ingredients (listed below).

Mix in 2 more Cups of bread flour. Knead on floured surface for at least 10 minutes (The more you knead, the better it will be). When sticky, add flour. Grease bowl or pan. Put top of bread in bottom of greased bowl and flip over to grease the dough. Let rise 1 1/2 hours or until dough has doubled in size.

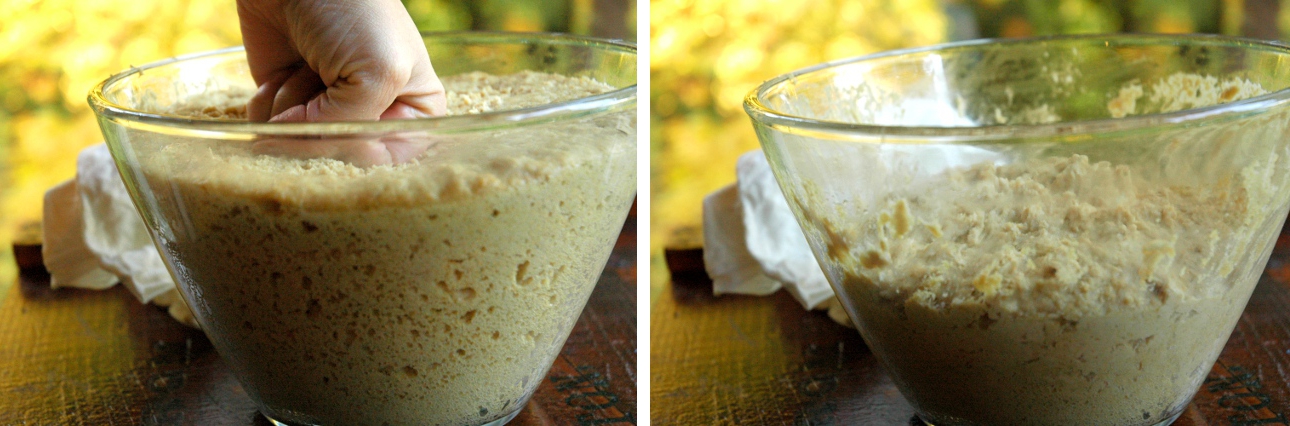
Punch bread down.
Knead for 2 minutes. Shape into 2 balls. Let rest (put bowl over balls for 15 minutes). Put dough balls onto a greased cookie sheet and spray with PAM (you can also put dough into loaf pans if you like).

Let rise for another 1 1/2 hours.

Preheat oven to 375°. Bake at 375° for 10-15 minutes to kill yeast. Bake another 30 minutes at 350°. Don't let your oven go below 325°.
Optional ingredients:
1/2-1C wheat germ (toasted honey kind)
1 Tbs nutritional yeast
2 eggs
1/2 C yogurt
wheat berries
Mom also gave me instructions for a quicker method that only involved one rise instead of two. She called it the "One Punch Way" which is kind of a misnomer since there is no punching with this method, but who'm I to argue?
The One Punch Way:
From first knead. Divide into 2 balls. Shape it. Let rest 15 minutes. Put on greased sheet. Spray with PAM. Then rise 1 1/2 hours. Preheat and bake. The difference will be the texture.

Bread Making Terms (As explained by my Mom and expanded a bit by me):
Proof: To make sure your yeast is fresh, and to dissolve it before adding it to your dough, you proof it by mixing it into warm water with a little sugar or flour. The yeast eats the sugar and that's what causes the bubbles.
Rise: Rising means the yeast is working to make the dough puffy. To make bread rise properly it needs to be out of any breeze, in a warm environment. You can put your dough in a warm oven, the microwave, or leave it covered on the counter as long as it can stay around 80° degrees. I am lucky enough to have a warming drawer in my oven with a "proof" setting. Additionally, to keep moisture in, Mom always covered hers with a clean, warm, damp towel. Other bakers may tell you to use cling wrap.
Punch: Literally, punch it down with your fists or push it with your hands. This will cause a little more gluten to form. Making the dough rise twice, changes the consitency of the dough, giving it more chew and density.
Other notes:
- Mom always kept her yeast in the egg compartment of the fridge. I do too. It doesn't necessarily have to go in the egg compartment, but it will keep longer in the fridge. Keep an eye on it though, the older it gets, the less likely it is to rise.
- If you do keep your yeast in the fridge, you'll get the best rise if you let it warm to room temperature before trying to proof it.
- Finally, if you don't already know this, you should never lick your fingers with raw yeast on them. In other words, don't eat raw bread dough. You'll get a stomach ache like you wouldn't believe.
Is there any smell more wonderful than the smell of bread baking in the oven? I submit that there is not! This bread is worth the effort, quirky Mom weirdness and all. Just a tiny bit sweet, it's great for sandwiches or with a meal. Or try it warm with a little butter and honey. It'll knock your socks off!

That looks like a gorgeous loaf of bread :) Love the rustic look Brooke!
ReplyDeleteThanks, Chinmayie! =)
ReplyDeleteI just cried a sad, gluten-free tear...
ReplyDeleteI wish I could help you out, Cara. I promise, I'll be churning out some gluten-free goodness before the Postapalooza is over!
ReplyDelete