Showing posts with label craft-ipe. Show all posts

Wednesday, March 25, 2015

A Very 80's Easter

     When I was a kid, my Mom made lemon cupcakes with coconut sprinkled frosting in little baskets to take to school at Easter.  My Great Aunt made cakes shaped like bunnies with lemon cake and coconut sprinkled frosting to feast on at the huge family Easter luncheons she used to throw.  When I was pregnant with my first son and craving lemon everything, I had to have lemon cake with coconut sprinkled frosting (generously supplied by my friend Susan, who I am convinced is the reason I survived my first pregnancy without killing somebody in a lemon craving induced stupor).  What I'm saying is that lemon cake with coconut sprinkled frosting and me go waaaay back.

     Unfortunately, the kind of cake and coconut I ate growing up is not how I eat anymore.  I haven't bought a Duncan Crockerbury box in a decade at least.  I don't use sweetened coconut or green food coloring (with one exception).  But I really, really wanted to make those little cupcake baskets with my boys that my Mom made all those years ago. 

Naturally colored Easter cupcakes lemon and coconut with matcha for green

So I did.

     I found Trader Joe's jelly beans, flavored and colored with fruit juice, modified an America's Test Kitchen recipe to taste exactly like the ol' boxed cake lemon flavor, and colored the coconut with matcha powder.  The result was pretty much exactly like what I remember from childhood.  Except the jelly beans.  I'm particular about jelly beans.  Beware the dark purple TJ's jelly beans.  They are not grape.  TJ's, if you're going to throw licorice about all willy nilly, you gotta warn folks.  Allz I'm sayin'.

Easter cupcakes with natural colors and flavorings

A beautifully decorated little basket with a not grape jelly bean on it.  And two others.  Who might be in cahoots.

To make the baskets Mom used to use construction paper, but I found a sweet little set of scrapbooking papers at Target.  Cut strips about 3/4 inch wide and 9 inches long and tape or staple them to an empty cupcake wrapper.  These are great for holding other candies or nuts, too!

How to color coconut for Easter grass with matcha powder

     To make the coconut, I found Bob's Red Mill unsweetened shredded coconut, and got some matcha powder at my local natural foods store.  I heated 1 tsp coconut oil in the microwave until it melted, then stirred in 4 Tbs coconut until just moistened.  Then I stirred in 1/2 tsp matcha powder.  It was a nice mossy/grassy color without changing the flavor too much.  Keep in mind, eating it plain, you will be able to taste the tea, but once you add the flavor of the frosting, you can't taste it any more.

  Since the Bob's Red Mill coconut doesn't have as strong a "coconut" flavor as the moistened sugar-coated stuff, I added 1 Tbs coconut oil (in solid form) to my butter cream frosting.  I used two sticks of softened butter, 1 Tbs coconut oil, 4 cups of organic confectioner's sugar, and about a Tbs of milk. Cream everything together with a mixer until frosting is smooth and fluffy. You may want to adjust the sugar and milk levels of your own depending on how fluffy you like your frosting.

Lemon Cake
Yields: 24 cupcakes

1/2 C whole milk, room temp
4 large eggs, room temp
2 tsp lemon extract (I used Nielsen Massey)
1/4 tsp vanilla beans
1 3/4 C cake flour
1 1/2 C sugar
2 tsp baking powder
3/4 tsp salt
16 Tbs (2 sticks) unsalted butter, cut into 16 pieces and softened
Zest of 1 lemon

Heat oven to 350°F.  Line muffin tins with 24 liners.  In a medium sized bowl, whisk the milk and eggs together.  In the bowl of your mixer, whisk the flour, sugar, baking powder, salt, vanilla beans, and zest together.  On low speed, mix the butter pieces in one at a time until the mixture resembles moist crumbs.  Beat in all but 1/2 C of the milk mixture, then increase the mixer speed to medium and beat the batter until smooth, light, and fluffy, 1 to 3 minutes.  Reduce the mixer speed to low and slowly beat in the remaining 1/2 C milk mixture and the lemon extract until the batter looks slightly curdled, about 15 seconds.  Give the batter a final stir with a rubber scraper and portion into cupcake liners till they are 3/4 full.  Tap the pans on the counter to release bubbles and settle the batter.  Bake until a toothpick comes out clean, about 10-15 minutes, rotating the pans 1/2 way through baking time.  Remove cupcakes from tins and cool on a wire rack.

Review:
The boys have been begging me for these all day.  I love these.  I may never share them.  You're just lucky I shared the recipe with you.  In fact, I take it back.  You can't have it.  Happy Easter, ya cake thieves.

Monday, July 21, 2014

Ice-Pops, Ideas, and a Give Away...

12 Ways to use Zipzicles Ice-Pop Pouches

So these are Zipzicles.

Zipzicle Ice-Pop Pouches
     You want these.  My friend Cara from Fork and Beans found some at Cost Plus World Market and went on to make some lovely homemade Otter-type pops.  I fiddled around on the Internet a bit and found that WizCo is just a few miles from my house!  They graciously sent me a sample pack and I went a little bonkers, ya'll.  I just kept on thinking of things to use these little pouches for!

Zipzicle Ice-Pops, Use 1 of 12
     First off, I did make pops.  'Cuz yeah, Summer.  These are each a different type of juice.  The clear one is a simple infused water concoction of nasturtium and mint.  Not sweet for the kiddles, but so nice for me on hot days!  Each pouch contains almost 1/2 a cup, so to make my grown-up Zipzicle:

Nasturtium and Mint Ice-Pop
1/2 C water per pop
2 nasturtium flowers per
1 two inch sprig fresh mint (about 5 leaves) per

Combine in a cup and let steep for 30 minutes.  You can muddle it a bit at the end if you like.  I chopped up a few blossoms to make it pretty, but you don't need to.  If you are using flowers, place a few chopped blossoms into the pouch, pour infused water in to the fill line, close bag, and tilt it back and forth gently to distribute the flowers evenly.  Lay flat for a few hours to freeze.

Homemade Nasturtium Mint Ice-Pops from Crackers on the Couch

The other pops are juices I bought at Trader Joe's, one is the Very Green Smoothie, one is carrot, and one is Tart Cherry.  The cherry one is especially good.  We also enjoy orange, grape, and fruit puree pops regularly!

And now for the rest!

Zipzicle Yogurt Tubes Use 2 of 12
     Next up, can we just talk about how long I've been wanting to make yogurt tubes?  I don't like store bought ones that are full of sugar and chemicals, and the organic frilly ones are few and far between.  I have thought for years that there had to be a better way.  Some way to make yogurt tubes at home.  This is it, yo!  These are homemade yogurt sweetened with a bit of honey.  No cane, beet or corn sugar, no rBST, just milk, bacteria, and honey.  Yummers.

Zipzicle Applesauce pouches Use 3 of 12!
     Number 3 is applesauce pouches.  1/2 C is a good portion of sauce.  You can fill past the fill line if you're not going to freeze it.  I found that the best way to fill these pouches with thicker things like yogurt and applesauce is to use a pastry bag to fill them half way, tap it once or twice to get out the bubble, and then fill the rest of the way.  For thicker substances or tough bubbles, a poke or two with a chop-stick will go a long way.

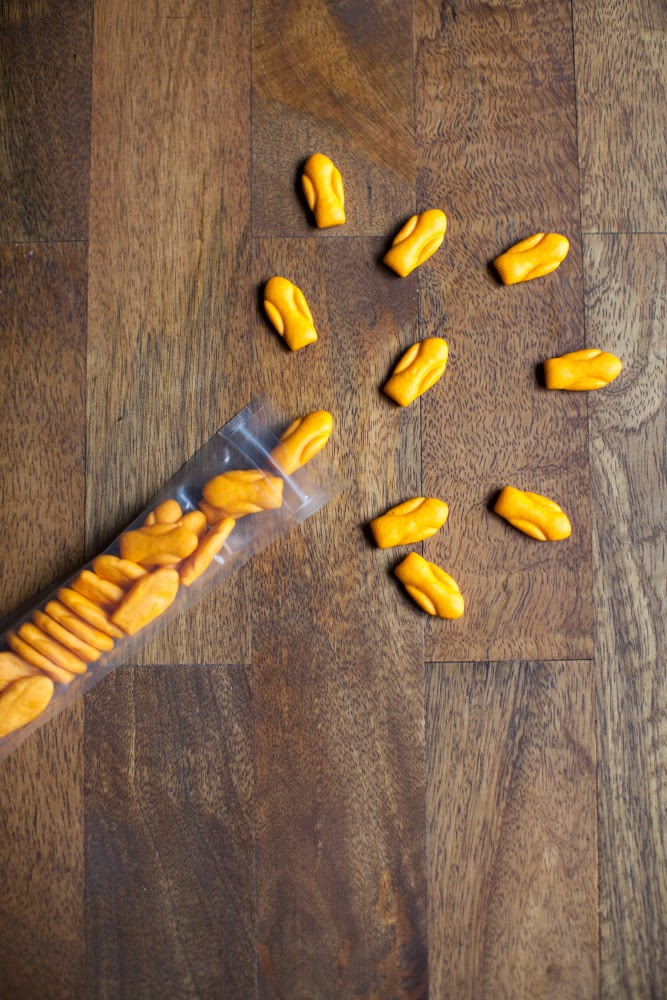
Zipzicle cracker pouch, use 4 of 12!
     Fourth up, any small, amusingly shaped cracker will fit beautifully into these pouches.  It's slightly less than a serving size, but just right for a lunchbox or a quick snack after karate.

Cute little s'mores treat sacks: Use 5 of 12! And speaking of snacks, let's talk dessert, shall we?  A few mini chocolate chips, some tiny marshmallows, and a graham cracker bear or two.  A large pastry tip makes a nice funnel for the chocolate chips.  I know this is the complete embodiment of opposite from what I said about the yogurt tubes, but you know, cute is cute sometimes and dessert is dessert and s'mores is s'mores.

Zipzicle pouches for trail mix: Use 6 of 12!
     For a healthier alternative while camping or hiking, Good Old Raisins and Peanuts really hit the spot.  A serving of peanuts almost fills up to the fill line, mix in a few raisins and GORP's your uncle!

Zipzicle pouches for packing hummus: Use 7 of 12!
     For flying, camping, or car trips, hummus makes a great snack, and 1/2 a cup of hummus makes a pretty healthy portion!  The flexibility of the pouches makes it really easy to get all of it out.  I've got a straw brush that I used to clean the pouches out after the hummus.

Zipzicles for Jello!  Use 8 of 12
    Again, with the food coloring, but you know what?  There's exactly enough room in these pouches for Jell-o.  I used the quick-set method so that the heat wouldn't melt the plastic.  Sets up faster that way, too!  I wonder if agar agar jello would work in these, but I think that by the time it was cool enough to pour, it would be set too far.  An experiment for another day, perhaps.
Zipzicles as party favor bags!  Use 9 of 12!
     Need a sweet little pouch for party favors?  Fill them up with candy, jewelry, or confetti!  (Maybe don't give out the confetti filled ones until the end of the party...)

Zipzicle soup pouches!  A great snack and use 10 of 12!
     I think this is my favorite idea: A little tomato soup and a pouch of oyster crackers!  Again, I poured the soup in cold, and served it at room temp.  It's a nice, healthy change-of-pace snack for the kid who's tired of cheese sticks and fruit slices.

Zipzicle craft packs!  Use 11 of 12.
     And then there are the non-food options.  Let's talk art-on-the-go, shall we?  Four thin markers fit very well in here, four or five colored pencils would do nicely, as well.  Just right for trips!  You can fit a few pipe-cleaners in here, too I bet, though I haven't tried it.  I did try Rainbow Loom bands and they were near impossible to get back out. Think, long and thin, and things that shake out easily.

Zipzicle small toy pouch.  Use 12 of 12.
     Speaking of things that shake out easily, a few Lego bricks are just the thing for a quick creation on the go.  Nanoblocks fit well, Micro Machines, too.

Here's a few more ideas!   
I haven't tested them, but you can!
  • Make your own "Pedialyte" pops.  Coconut water is an excellent (and more tasty) electrolyte replenisher!
  • Try these for pureed baby foods or toddler snacks like Cheerios.
  • Going camping? Fill one with ketchup, one with mayo, and one with mustard.
  • Maybe a small First-Aid Kit, a couple of Band-aids and a tube of Neosporin.
  • What about filling one with mouthwash for weekend trips?
And Now, A Give Away!!
Have some ideas for these lovely little bags?  Wanna get some for free?  Well, you, my friend are in the right place!  WizCo is allowing me to give three lucky people a free 12-pack of Zipzicle pouches!  Leave me a comment here or on my facebook page with your favorite ice-pop flavor or a new idea for the bags and you'll be entered to win!  Contest ends on Friday so chime in!

*Give Away Has Now Ended*

Monday, December 23, 2013

I've had me a day...

I was going to write a post all about how my awesome and beautiful gingerbread house came to be.  In the past, I've made houses that looked like this:

 2010, first gingerbread house ever.  Construction was a little saggy, but I did a pretty good job piping stuff considering I'm really, really bad at it.

And This:

 2011: Ice cream cone trees, little stands for the ginger bread folks to stand on, pretty good piping again, chimney addition.

And This:

2012: Kirby and a fisherman join the scene and I toyed with pretzel windows.  It was the first year for a cereal roof, which fell off twice before finally staying put.  The boys did a lot of the piping in this one because 1) I was sick as a dog and 2) They are actually really good at piping.  They were 4 and 6, people!  4 and 6!  Look at that star!

Every year, a little more practice, a little better execution, a little more detail... I figured by the fourth go around I'd be ready to lay something gorgeous on ya'll.

But since I'd got all creative and fancy blogger pants, I thought I'd change to a different recipe for the house AND also change the glue.  This is what happened:


And this:
 And this:

Nailed it.

So what I'm giving you instead is a lesson in... I dunno... stubbornness and a shear force of will on the part of my children to consume as much gingerbread house candy as humanly possible without exploding like that guy on Monte Python. 

I ran to the store and bought graham crackers and canned frosting.  Yup.

And my son, who just turned 8 still rocked it with the piping.  Look at those icicles!

And my son who is about to turn 6 is rockin' some hella-cool architecture skillz.


 And I got to put my cereal roof on again.

And the moral of the story is that no matter what you have planned for the holidays, if you're with people you love, it's time well spent no matter how it turns out.

Tuesday, December 17, 2013

12 Days of Christmas Treats Day 12: Applesauce Ornaments

12 Days of Christmas Treats Day 12: Applesauce and Cinnamon Ornaments

     "What?" you say.  How come no eating food stuffs on the last day of Christmas Treats?  Well, because this is the last day of Christmas Treats probably forever.  It takes a lot out of me to do such a long session and during this really busy time of year, I just can't take so much time away from my family!  I will probably do some Christmas posts next year, but I think 12 Days has run its course.*  So I'm ending on a beautiful note with these fun applesauce ornaments.  They are mostly made with food ingredients, so give me a little credit.  These are a great craft for kids now that school's almost out for the season and when they're baking they make your house smell yummy!  They keep their scent all winter and store pretty well if you're careful with them so they will greet you with cinnamon goodness this time next year, too!

12 Days of Christmas Treats Day 12: Applesauce and Cinnamon Ornaments

*Unless I get like 6,000 people begging me to do it again because they can't survive Christmas without me, of course.  Feel free to beg.  It probably won't take too much arm twisting, to be honest.  Commenting on my beauty and cleverness will get you far.  

12 Days of Christmas Treats Day 12: Applesauce and Cinnamon Ornaments

Cinnamon Applesauce Ornaments
1 C cinnamon
1 C applesauce
1/4 C Elmer's glue

Stir ingredients together, wrap in plastic and let sit for 1 hour.  Preheat the oven to 200°.  Roll dough out between two sheets of wax paper and cut with Christmas cookie cutters.  Don't forget the hole for hanging, a straw or a toothpick are great tools for this.  Line a cookie sheet with wax paper and bake ornaments for 2 hours, flipping half way through cooking time.  Enjoy the aroma.  When ornaments are done, remove from sheet, let cool and hang them onto your tree!  If you have time, these can also air dry, but they take a few days before they're done completely.

Word to the wise:
Don't rely on any mystical non-stick properties your cookie sheet claims to possess.  Trust me on this.  These ornaments scoff at your naivete and spit in the eye of your sheet's non-stick assertions.  They will cling to your cookie sheet with the unholy force of 1,000 possessed weasels.  We're talking honey badger level not caring about your cookie sheet's non-stickiness. 

12 Days of Christmas Treats Day 12: Applesauce and Cinnamon Ornaments

Word to the unwise:
If you did just go ahead and bake these without the wax paper, I know your pain.  Soaking the cookie sheet for a day in water should do the trick.  You'll end up with a nice clean pan, but unfortunately probably no usable ornaments...  (I think we managed to get one off.  It disappeared so either the boys broke it or the cat ate it.)

12 Days of Christmas Treats Day 12: Applesauce and Cinnamon Ornaments 

Review:
This makes really nice dough that's easy to work with.  The boys loved making all sorts of figures with it and they actually hold up pretty well.

Wednesday, April 20, 2011

That's Just Not Kosher...

     Not everything in my recipe box is a recipe.  So, since I already posted a recipe this week, and in the spirit of Easter, I thought I'd post this little "craft-ipe."  It came from a Jet-Puffed Marshmallow flier in the Sunday paper.  I made a couple of mistakes, but it was just a little fun Easter-y thing to do with the boys.  I'd do it differently if I wanted these to actually hold together.
     This would be a super cute project for a classroom.  And for once, it wasn't hard convincing my two to eat up!


Marshmallow Bunny
5 Jet-Puffed Marshmallows
1 (8-inch) piece shoestring licorice, ribbon, or string
10 Jet-Puffed Miniature Marshmallows
2 tablespoons canned white frosting
Assorted candies, for decorating

Stack 2 large marshmallows, securing with some frosting, for each bunny.  Tie licorice, ribbon or string around middle of each marshmallow to separate "head" and "body" sections of bunny.
Cut remaining large marshmallow int quarters lengthwise; using frosting attach 2 quarters for "ears" to each bunny head.
Attach 4 minature marshmallows for bunny "paws" and 1 for cottontail to each bunny with remaining frosting.  Use assorted candies to make faces.  Let dry.


My substitutions/additions:
  • I made my own buttercream frosting instead of investing in an entire can of frosting.  Therein lay my mistake.  It wasn't nearly wet enough and didn't hold them together at all, besides the fact that you could see the creamy color of the butter so it showed on the 'shmallows.  If I ever do these again (and it matters they stick together) I'll use toothpicks.
  • Also, I didn't have any licorice and I didn't bother with ribbon.  I think they're plenty cute without a bow.
 Review:
Super-cute and easy little project.  I guarantee my boys will ask to do these again!
Related Posts Plugin for WordPress, Blogger...