Showing posts with label Hints and Tips. Show all posts

Monday, October 1, 2012

Gimme a little Sugah, Baby....


*Excuse me for a minute folks, it's hard to get this saddle on my high horse...*

There now.  That's better.  So!  People ask me from time to time what "Sucanat" is.  It's a sweetener I use made from sugarcane that is one of the "healthier" sugars, if there is such a thing.  Today being the first day of October Unprocessed I thought I'd talk a little about cane sugar.  I think we can agree that when it comes to unprocessed, high fructose corn syrup is right out.  Recently, a few soda companies have gotten wise to the fact that people are trying to eat "real" and have begun marketing sodas "sweetened with real sugar."  To this I say, "It's a start, I guess." 

*My high horse just jumped up on my giant soapbox.*

It takes a lot of processing to make a giant green grass stalk into a tiny white granule.  You can find a detailed description on the EPA's website.  But basically, it goes like this:

1)Sugar cane is harvested.
2) Cane is delivered to the factory.
3) Cane is chewed up in machines.
4) Bulk of the stalk (bagasse) is removed.
5) What remains has water or juice added to it.
6)-? The mixture is repeatedly heated and washed with various bleaching agents, and spun in a centrifuge. The molasses is stripped away.  In the case of white table sugar, one of the extra little ingredients used to bleach it is cow bones.  Tasty.
The final product is a shiny white crystal, perfectly sweet and perfectly clean for just about anything you want to sweeten.  But then, at what cost?

Every bit of anything even remotely healthy from the sugar cane has been stripped away (which is admittedly minimal at best) and the finished product has been steadily bathed in chemicals.  I'm calling this "Processed."

*Banging shoe.  I'm banging my shoe, people!*


 These are all the sugars I could find in the store easily.  
  • White sugar is what we Americans grew up on, of course.  Brown sugar (not pictured) is just refined white sugar with molasses added back to it.
  • Evaporated Cane Juice is less processed, but doesn't retain much of the molasses as you can tell by the color.  
  • Turbinado sugar is sometimes called Demerara and is marketed under the name Sugar in the Raw.  Seriously, I don't know how they get away with this.  It's a giant crystal that's clearly been formed by cooking it!  In fact, unless you are sitting in a field somewhere sucking on a sugar cane, there's nothing raw about any sugar.   
    *Pause for more banging*
All of these products (except white sugar) have had the molasses removed at some point in the cooking process and have had portions returned for a more natural look and flavor.  I'm calling these "Processed."

*I'm looking down my long nose at these sugars.  My high horse is, too.  Although, I think he may be thinking a little bit about how delicious sugar cubes are.*

Sucanat is a brand name of cane sugar.  It is squeezed, cleaned with slaked lime, heated and stirred until granules form.  It is not bleached.  It's then dried and packaged. I have read (on the Internet which is the all-knower of things and the never-producer of falsehoods) that the molasses is removed and added back in for a uniform color.  The manufacturer of Sucanat lists their process on their website, and doesn't mention this, so take that little tidbit with whatever size grain of salt you want.


 Whole cane sugar is pretty much the same darn thing except apparently, they don't strip out the molasses and there may or may not be a "cleaning" process.  This brand has a chart on the back of the package detailing the process: The cane is squeezed, the juice is filtered, heated, and dried, then ground with a sieve.  I'm calling these "Less Processed."

*The heel of my shoe just fell off...*


The thing is, that though these may use varying degrees of processing to produce, there is still a fair amount of energy, chemicals, and general mucking about involved in the production of all of them.  And the calorie count is still the same.  Sugar is sugar.  And sugar isn't really super healthy.  I use Sucanat because I can get it from a bulk bin which means I can buy as little as I want and it is less expensive than getting it off the shelf.  If I happen to run across it, I do occasionally buy whole cane sugar by Rapunzel, though in researching this post, I'm not sure if there is much difference after all.  There are still times when the more natural sugars won't do.  Christmas cookies, for example, don't work as well with sugar full of molasses.

It's quite the conundrum.

The rules for October Unprocessed basically boil down to if you can't conceivably make it at home, you shouldn't buy or eat it.  If I had a field of sugar cane growing out back, I could probably figure out how to make one of the non crystalline granules.  But since I don't and I'm a food blogger and I just want to see what will happen, my solution this month will be:
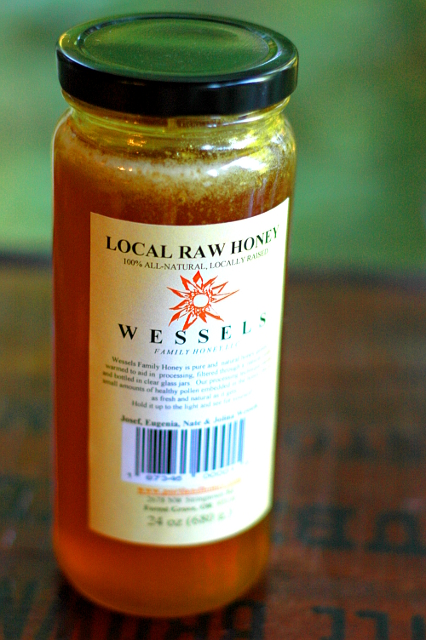
Raw, Local Honey.

Now, here's an article about how most of the honey in the US isn't technically "honey" anymore because it's been so processed.

*My horse just "went" on the soapbox.  I think I heard him say "Oh" first.*
We're all thinking it, horsey.

Saturday, November 12, 2011

A Thanksgiving Timeline...


     When I plan for Thanksgiving, I like to make sure that I know which food I'll be making, what I have already, what I need to buy, and when I'm going to make it.  This is what my lists look like for this year.  (Though this is a much neater version, all in one place.  The "real" version is scribbled on a million scraps of paper which move around on legs of their own and also seem to multiply.  I'm thinking of instituting a breeding program...)

     There are a couple of things on the menu that I haven't and won't give recipes for.  My mashed potatoes and green beans aren't anything to write home about.  They're good places to put butter and gravy and quick things to make the day of that I don't have to think about when I'm focusing on not burning the darn chicken.

Menu
Dish
Timeline
Bread Up to 1 month in advance
Pumpkin Monday
Cornbread Tuesday
Stuffing Wednesday
Gravy Wednesday
Cranberries Wednesday
Pears Wednesday
Roast Veg. Wednesday
Dessert Wednesday
Chicken Thursday
Mashed Potatoes Thursday
Green Beans Thursday


Check Lists
Check the Pantry
Check the Fridge
Check the Cellar
Grocery List
cloves
cinnamon
nutmeg
ginger
salt
pepper
sugar
brown sugar
whole wheat flour
all purpose flour
bread flour
vegetable oil
olive oil
3/4 C cornmeal
1/4 C grits
1 can evaporated milk
2 C mushroom stock
pecans
2 boxes of butter
2 C milk
eggs


5 small red potatoes + more for mashed potatoes
3 onions
1 1/2 heads garlic
3 medium apples


1 Quince
1 Parsnip
Chicken
1 package of Poultry herbs (Rosemary, Sage, Thyme)
1 package of Sage
1 Fruity White wine like Riesling or Pinot Grigio
Celery
8 oz Cranberries
1/2 lb Chanterelles
1 Portobello
6 pears
1 box yellow cake mix
1 bottle whipping cream
Fresh Greenbeans
Snowdrift Cider

Wednesday, October 26, 2011

A Canning Primer...

One of the few cooking things I did with my Mom as a kid was help with canning.  I remember putting up jar after jar of tomatoes and I remember her putting up soup using the pressure canner.  I remember waiting for all the jars to "tink" so we knew they were sealed and I remember eating right away the ones that didn't.  At the time I didn't think much of it, but now it helps me feel connected to her and my grandmother and all the previous generations who saved food this way.  At one point in my "trying to get back into this cooking thing" phase I decided to make and can jam at a friend's house.  Not only did the jam not set, the jars wouldn't seal either.  I still don't know what happened to the jam, but the open jars may have had something to do with the way I tried to can them.  Neither of us had a canner and there was only going to be one jar made anyway so I got the bright idea to turn the jar upside down and try to melt the seal in a pan of boiling water! Yeah, that didn't work...   So my friend ended up with freezer syrup.  Hopefully the jar of this summer's jam I sent her made up for it!

There is an initial cost, but it does save money in the long run, especially if you are preserving food you have grown yourself.  I live in the darkest pit of the darkest part of Washington state.  I am grateful to get a few salad greens here and there, nothing to preserve, but I do get bulk orders at my farmer's market and it still works out cheaper than organic jam or canned tomatoes from the grocery store.

This may look like a long post, but rest assured it's not a complicated process at all.  I highly recommend you arm yourself with a good book on preserving (The Ball Complete Book of Home Preserving is the standard by which all books on home preserving are measured in my opinion...)

And now, a look at the tools:

These here are jars:

 
The one in front is a half pint, behind it is a pint, and behind that is a quart.  They make much larger jars and some smaller or differently shaped ones, but these are the basic three jars I use.  I like the wide mouth jars as they are easier to fill.  There are smaller standard size lids, too.  Whichever size you choose, try to stick with one common size, so you only have to buy one style of lids for all your jars. 

These are the lids and the rings (sometimes called bands).  Rings, like jars, are reusable.  Lids should only be processed once.  You can use them for a while in the fridge after you open it, but you should never use them to can with again.  There are some re-usable lids, but I haven't used them.  I am intrigued though...
This is a standard set of canning tools.  There are two jar lifters, a funnel, and the little magnet on a steek there is for picking up hot lids.  (More on that later...)

Water bath canner.  Basically, a giant pot with a lid.  The big metal disk in the front is called a rack.  Racks come in all shapes and sizes.  You can even use a bunch of rings tied together.  You just need something to keep the bottom of the jars off the bottom of the pan to encourage circulation and keep the jars from breaking.  You don't need a water bath canner.  Any large pot with a lid will do.  Canners just tend to be larger so you can process more jars at once.

This is a pressure canner.  You can see the rack again.  Mine came with three weights for 5 pounds pressure, 10 pounds, and 15.  I think my Mom's model had one weight that you just turned so a different hole let out a different amount of steam.  You may see some with pressure gauges at the top.  This one is just a basic, inexpensive pressure canner.  In fact, I got it at Ross.  You can also see the steam valve at the top.  There is also a rubber or silicon seal in the lid.  Some also have additional valves which, should anything go wrong, will allow the steam to escape safely.  Most also come with safety latches that will not allow you to open the lid if the pressure is not completely gone.  They've basically made it idiot proof.  Which is good for me...  The main thing with pressure canners, or pressure cookers in general, is to make sure the valve is clean and the seal is in good shape (not cracked).  If the valve is dirty or clogged it will cause the pressure to build too much and you'll end up with stuff on your ceiling.  If the seal is cracked it won't form pressure properly which will result in an unsafe product. 

Is that as clear as mud to everybody?  OK?  OK!

Next, let's talk about preparing jars for canning.  I have read that if you're going to pressure can you don't have to do anything to prep the jars.  I don't do this, it just doesn't feel right to me.  And usually my jars are covered in dust anyway...  Basically all it means is getting the jars nice and clean and hot (read sanitized) so you're not introducing any bacteria into your product.  The most popular method these days (because it's dead simple) is to wash everything in your dishwasher.  The end.  Super simple.  Alternately, you can do it the old fashioned way and boil your jars.  Your lids need to be sanitized, too, but don't boil them.  They need to be nice and hot but if you boil them they may not set properly.  You don't need to sanitize your rings.  If you want to toss them in the dishwasher, that's fine, but I highly recommend you not boil them as you have to use your bare hands to put them on the jars.  I've learned this the hard way more times than I care to admit...

Now the scary stuff:
Botulism.  Caused by a bacteria called Clostridium botulinum, it's odorless, tasteless, and it can make you very, very sick.  And if you haven't canned properly, you can get it from your canned goods.  The best way to make sure this doesn't happen is to make sure you use the proper canner for what you are canning.  Sweet things like jam, and applesauce, and very acidic things like tomatoes, and pickles can be safely canned using a water bath.  Savory things like soup, beans, and meat should be canned using a pressure canner.  Always follow the times and weights for the items you are canning.  Botulism cases are very rare, but very serious and most importantly, are preventable if you use proper methods.  To that end, most of what I can is directly from the Ball Book of Home Preserving.  All the times and acid levels have been properly researched, so I feel a little safer doing it their way.  With my mushroom stock, I followed their cook time for vegetable soup, which is different than that of chicken or beef soup.  With all that said, I know tons of people who can and I've never met anyone who got botulism. 

There now.  If I haven't scared the pants completely off you,
Let's get down to it:


Are you ready?  Get ready!

My friend Jennifer gave me some beautiful Asian pears off her tree last week so I thought I'd use them to show you the basic steps.  So step one, start with beautiful, fresh produce.

Prepare your produce.  This recipe called for the pears to be soaked in a lemon juice solution and packed raw in a syrup.  This step might include making the jam, applesauce, or whatever.  While you're preparing your food, you should also be sanitizing your jars and lids.  An easy way to do it (besides the dishwasher) is to put them in your canner and heat them in there.  That way, your water is already warm and close to boiling when it comes time to do the processing.
Back to the syrup.  I made my syrup using Sucanat, thus the dark color.  You can also use water or fruit juice.  Artificial sweeteners don't usually do very well in canning.  They tend to discolor or leave an off taste.  If you are canning applesauce or things that might stick to the side of the jar, run a butter knife down and around the side of the jar to release any bubbles.  These two jars are filled a little too full.  You need to leave space at the top of the jar, I usually stop at the bottom thread.  I was so excited to take these pictures, I wasn't thinking... Sorry... =(

Wipe the rim.  This is especially important when you're canning something with seeds (like jam).  One little seed can cause the jar not to seal properly.

Place the lid on the jar.

Screw on the ring until it's finger tight.

Place the jars in the canner and make sure the water is covering them by a good inch.  Process the jars by boiling them in a canner for the time prescribed in your recipe.  These pears required a water bath.  If you are using a pressure canner, let the canner vent for 10 minutes before putting the weight on.  Make sure you are using the correct amount of weight.  (I haven't found a recipe that called for anything other than 10 pounds, but that doesn't mean anything...)

 When the time is up using a pressure canner, turn off the heat and wait for the pressure to go down on its own (on my canner, the lid lock falls when the pressure is completely gone.)  Using a water bath canner, remove lid and wait a few minutes before removing jars.  I cool mine on a wire rack, but you can use a folded dish towel.  Listen for the "tinks."  If all your jars seal, Congratulations!  You did it!  Once it's cool, you can put a fancy label on it or use masking tape like Mom did.  You should date your cans just so you know how old it is.  If you have a jar that doesn't seal, check the lid and see if you can figure out why it didn't seal.  You can re-process the jar with a new lid or you can just eat that jar for dinner that night!  You don't need to leave the rings on the jar once everything has sealed.  I usually do just so I don't lose them.  If you do decide to leave them on, make sure you take them off and wipe them down before you store them.   Left-over water can cause them to rust.

There now... I hope I have inspired you and not completely scared you to death!

Update!
I've done a post about using reusable canning lids!  It's almost as easy as using metal lids without all that annoying BPA and if you do a lot of canning every year, they work out to be pretty economical!
Related Posts Plugin for WordPress, Blogger...