Showing posts with label fail. Show all posts

Wednesday, March 27, 2013

Sometimes Things Just Don't Work Out...

You may remember last year's post in which I tried to find my friend Laura's cake, failed, and coincidentally our trip to Hawai'i was coming up and also Easter.  It's that time again.  It's almost Easter, we're on our way to Hawai'i, and I'm going through my recipe box looking for Laura's cake. 

I found another recipe that sounded about right, but the problem was that it used a boxed cake mix, instant pudding, and Cool Whip.  And you guys know that's not how I cook, right?  So I decided to make the whole thing from scratch. 


My poor pineapple had bed head...


 First time I ever opened a coconut.  It wasn't terribly hard, actually...

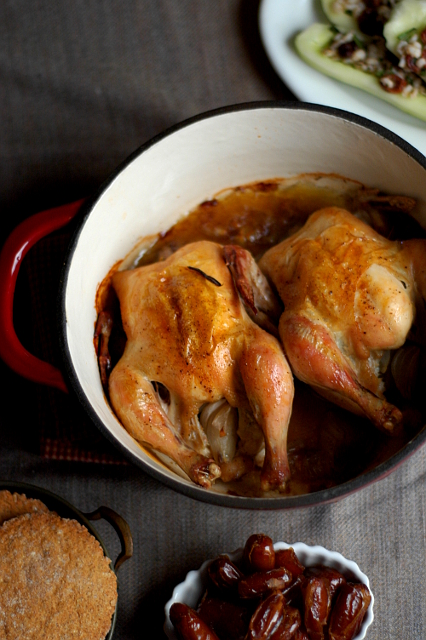
And this was the product.

 Isn't it gorgeous?!


 And it tasted?

 Absolutely.

 Disgusting.

The cake was perfect.  Genuinely wonderful.  The frosting was Spectacularly Awful.  I narrowed it down to the pineapple.  It tasted fine by itself, but somehow when it got mixed in with everything else it was bitter and... I'm just gunna say it... unholy.  It was unholy, people.

So I am giving you the original recipe.  That tastes good.  And not gross.  And I will tell you what I did in case you want to avoid whatever innocent mistake I made that went that horribly, horribly, horribly awry.  

Pineapple Cake
Yellow cake mix (prepare as directed on box)
1 pack (small) vanilla instant pudding
4 oz cream cheese
1/2 pint of half and half
1 can crushed pineapple (drained)
1 C shredded coconut
1/2 large container Cool Whip
Chopped walnuts

Combine pudding, cream cheese, half and half.  Mix till smooth on medium speed for about 2 minutes.  Fold pineapple, coconut and Cool Whip into pudding mix.  Frost cake.  Sprinkle with walnuts.

What I Did
The cake recipe is modified from the All-Purpose Buttery Yellow Layer Cake from The America's Test Kitchen Family Baking Book, pg. 280.

1/2 C Whole Milk, room temp.
4 large eggs, room temp.
2 tsp vanilla extract*
1 3/4 C (7 oz) cake flour (I used Bob's Red Mill PastryFlour)
1 1/2 C (10 1/2 oz) sugar*
2 tsp baking powder
3/4 tsp salt
16 Tbs (2 sticks) unsalted butter, cut into 16 pieces and softened
*I found vanilla sugar at the store.  I used 1 C sugar + 1/2 C vanilla sugar

1. Adjust an oven rack to the middle position and heat the oven to 350 degrees. Grease and flour two 8- or 9-inch round cake pans, then line the bottoms with parchment paper.  Whisk the milk, eggs, and vanilla together in a small bowl.

2. In a large bowl, whisk the flour, sugar, baking powder, and salt together.  Using an electric mixer on medium-low speed, beat the butter into the flour mixture, one piece at a time, about 30 seconds.  Continue to beat the mixture, one piece at a time, until it resembles moist crumbs, 1 to 3 minutes.

3. Beat in all but 1/2 C of the milk mixture, then increase the mixer speed to medium and beat the batter until smooth, light, and fluffy, 1 to 3 minutes.  Reduce the mixer speed to low and slowly beat in the remaining 1/2 C milk mixture until the batter looks slightly curdled, about 15 seconds.

4. Give the batter a final stir with a rubber spatula to make sure it is thoroughly combined.  Scrape the batter into the prepared pans, smooth the tops, and gently tap the pans on the counter to settle the batter.  Bake the cakes until a toothpick inserted in the center comes out with a few crumbs attached, 20 to 25 minutes, rotating the pans halfway through baking.

5.  Let the cakes cool in the pans for 10 minutes.  Run a small knife around the edge of the cakes, then flip them out onto a wire rack.  Peel off the parchment paper, flip the cakes right side up, and let cool completely before frosting, about 2 hours. 

This part is awesome.

Now for the rest of it:
1. To open the coconut, I used the heat and beat method I found here: http://www.wikihow.com/Open-a-Coconut though, I think the oven is supposed to be 400 degrees instead of 200 degrees.
I shredded it in the food processor using the shredding plate.  Then I toasted it in the oven following these directions.

2. I peeled and cored the pineapple and also shredded it using the shredding plate in the processor.  Then I drained it for a few seconds in the strainer.  There ended up being about 10 ounces.

3. I made the vanilla pudding recipe from my Valentine's post.  I used half of it.

4. I made whipped cream using 1/2 pint of whipping cream, three tsp agave nectar and 1/2 tsp vanilla.

5. And I used a brand of cream cheese that doesn't have any chemicals and junk in it.

And then I mixed it all up and somehow it tasted like earwax.  So there you go.  You tell me.

And you know what else?  It's still not Laura's cake...  I'm pretty sure this was one my Great Aunt Ophelia used to make.

But it was beautiful.

On the homeschool front this year, I used many of the same books from last year, but I also found two new story books for the kids.  Punia and the King of the Sharks a Hawaiian Folktale and Pig Boy: A Trickster Tale From Hawai'i.  Both of them were a hit with the boys!  Libraries are awesome, ya'll!

Monday, September 17, 2012

Summer School

     I alluded to this post a while back and am finally putting it up!  A couple of weeks ago our family went to see the King Tut exhibit in Seattle.  It's the last stop on the tour before the artifacts go back to Egypt.  I really wanted the boys to learn a little about Egypt and pyramids and mummies and all that since most of what they knew before came from Phineas and Ferb.   I wanted them to understand some of what they might see before we went in hopes of them remembering it for a while before that part of their brains get sucked up by Angry Bird scores.  

     I checked out books from the library, found some general themes and read pieces of them at a time to the boys.  We did studies on beards, pyramids, religious beliefs, animal mummies, hieroglyphics... Anything I thought the boys might find interesting.  Turns out that no matter how much you learn ahead of time, looking at a hundred old statues in the dark just isn't that interesting to a 4 year old...

A statue of King Tut.
(This one is blurry because my youngest was ramming me like a rhinoceros...)

Here he is studying a projection of texture on a wall.  Yep.  That's my boy!

The death mask of someone who's name I didn't write down.  I wasn't familiar with it.  And I was getting rammed by a 4 year old rhinoceros.

King Tut's canopic jar.  This one held his stomach.

My eldest was slightly more interested in the exhibit and clearly learned how all good pharaohs are laid to rest.

The boy's favorite piece of antiquity?  The toilet seat.  I didn't get a good picture, but you can see what one looked like here.  Proof that Everyone Everywhere for All Time has Always Pooped.

Here are the books I checked out from the library for our study.  I had originally checked out more, but I didn't use all the books because the boys were a little freaked out by the ones with graphic pictures of mummies (some are babies with their eyes missing and such...).

For Our Study:
Tut's Deadly Tomb by Natalie Lunis (My eldest like this one since it looked so spooky, but was a little disappointed that it debunked all the rumors...)
Tutankhamun by Demi (A very good early introduction to King Tut's life and family history)
The Everything Kid's Mummies, Pharohs, and Pyramids: Puzzle and Activity Book: Discover the Mysterious Secrets of Ancient Egypt by Beth L. Blair (A fantastic little book with mazes and word puzzles, each page also contains a mini history lesson.  I used this book for worksheets for the boys.)
Mummies and Pyramids by Sam Taplin. (This one and the next one are the two I used the most, quick little lessons without too many graphic pictures that were short enough for my boy's attention spans.)
How People Lived in Ancient Egypt by Jane Bingham

Other Resources:

The Crafts and Culture of the Ancient Egyptians by Joann Jovinelly
Ancient Egypt: a First Look at People of the Nile by Bruce Stachan
Cat Mummies by Kelly Trumble

Also, I bought these little aids from Amazon:

Lift the Lid on Mummies. A mummy kit that contains a body, organs, canopic jars, wrapping... all the stuff you need to make your own mummy.  The boy's favorite by far.

Safari Limited Ancient Egypt Toob.  They lost all the pieces to this almost immediately, but there were several times my youngest saw things in the exhibit and said, "Hey!  We have the toy of that!"

Stories from Ancient Egypt. We read a few stories each night before bed.  The stories are quick and engaging and apparently stories that were actually part of the oral tradition in ancient Egypt.

Supplemental just for fun:
Skippy John Jones In Mummy Trouble by Judy Schachner
10 Little Mummies by Philip Yates

I broke it down like this:
Day 1: Overview
Day 2: Beards!
Day 3: Animal mummies
Day 4: Mummy Model
Day 5: Gods
Day 6: Burial and Afterlife
Day 7: Pyramids
Day 8: Food
Day 9: King Tut
Day 10: Hieroglyphics
Day 11: Review
Day 12: Exhibit!

Each little "day" took about 15-20 minutes depending on how long they spent on the worksheets and/or in the bathroom... Some of the early ones were pretty short just to grab their attention and get them into the swing of "school" again.

See there how Day 8 was Food day?  The books I checked out from the library didn't say much about what the average citizen ate.  It seems it was mostly beer, wild game and fish, and barley.  The wealthy had infinitely more options, of course.  I learned at my local farmer's market that Kamut is an ancient Egyptian form of wheat as I was forking over some serious bread for a bag full.  My other resource was a cook book (one of my favorites) called The Good Book Cook Book.  It's got recipes from the Bible or inspired by certain verses as well as a menu section in the back.  One of the menus it has is an Egyptian Banquet.  Visions of sourdough danced in my head.  It didn't work out...  It formed bacteria but not yeast.  Yum.  Also, the kamut breads (pictured) I had planned as a back up flopped.  Well, they didn't "flop" so much as become rock hard and inedible.  I'm sure this is entirely my fault and not the recipe.  I found the recipe at Our Daily Salt, perhaps you will have better luck than I did...


The menu in The Good Book Cookbook is as follows:
Three Bean Soup
Cornish Game Hens with Nuts
Duck in Grape Juice
Fried Fish in Radish Sauce
Whole Baked Garlic
Fig and Grape Salad
Cucumbers Stuffed with Barley and Raisins
Sabbath Bread or Challah
Sourdough Fig Roll
Watermelon

What we had:
Three Bean Soup (Ran out of time)
Fig and Grape Salad (Figs are not in season here yet)
Cornish Game Hens
Cucumbers Stuffed with Barley and Raisins (revised)
Sourdough Fig Roll (Had to throw out the dough)
Kamut Egyptian Flat Bread (Turned into hockey pucks)
Dates

Yeah...It got... scaled back a bit...

Cornish Game Hens
2 Cornish Game Hens, thawed
4 medium Scallions
Salt and Pepper

Preheat oven to 400°.  Rinse and pat hens dry.  Peel and quarter scallions and place two scallions in each cavity.  Place birds into a heavy cast iron enameled pot.  Season with salt and pepper.  Bake for about an hour until internal temp reaches 165°.

Cucumbers Stuffed with Barley and Raisins
The original recipe calls for this to all be boiled in a large pot for 35 minutes, but it was hot and I was tired and cooked cucumbers sounded gross to me so I served it as a cold dish instead!

6 cucumbers
1 onion, chopped
2 Tbs olive oil
1 C cooked barley
1 C raisins, soaked for 1 hour in water and drained
1 Tbs vinegar
2 Tbs fresh mint or 2 tsp dried
1/4 tsp cinnamon
Salt and Pepper to taste
7 Tbs Garlic Mint Relish (optional)

Halve the cucumbers lengthwise and remove seeds, forming pockets.  Peel cucumbers only if they are waxed.  Set aside.  Saute onion in oil until golden.  Add barley, soaked raisins, vinegar, mint, cinnamon, and salt and pepper to taste.  Stuff cucumber pockets with barley raisin mixture and refrigerate until chilled.

Garlic Mint Relish
3 cloves garlic
4 Tbs fresh mint or 4 tsp dried
1 tsp salt
2 Tbs vinegar

Crush garlic, mint, and salt with a mortar and pestle or in a small bowl with the back of a fork.  Add vinegar.  Sprinkle over stuffed vegetables before serving.

Notes:
I used white vinegar in the relish.  It was really strong.  I think next time I may try red wine, cider, or maybe even balsamic instead.  Whoof!

Review:
The boys loved the game hens.  They did not love the cucumbers.  My youngest took out all the filling and ate the cucumber and my eldest actually wanted it to be hot.  Oh well.  And of course I couldn't keep them out of the dates.  I only had stuffed cucumbers for dinner since nothing else on the menu worked out.  So there you go.  We would have starved as ancient Egyptians...  But for the record, my husband loved all of it!

Wednesday, May 11, 2011

That's the Way the Cookie Crumbles...


When I dug this recipe out of the box I was so excited.  No cane sugar, lots of fiber, relatively low calories... It came off a box of Back to Nature Oat Bran Flakes cereal many years ago.  I don't know how to begin to tell you how I messed these up.  So many ways, really. 
  • First off, I couldn't be bothered to find the actual measuring spoons so I guesstimated using silverware even though I knew better.  Bad.
  • Apparently "Back to Nature" used to be a generic brand at some store I shopped at in CA and is either no longer in existence or at least not in WA so I subbed Nature's Path Flax Plus Multibran flakes.  I don't know how different the two are.  Bad?
  • I used 1/2 C raisins instead of choosing the optional full cup of dates.  Bad. 
  • I used the wrong kind of dates.  I used the chopped and floured dates, but should have used the kid of dates you have to pit.  Bad. 
The end result was bad cookies that were also yucky and not very good.

Back to Nature Date-Oat Bran Cookies
1 C Back to Nature Oat Bran Flakes
1/2 C dates
1/2 C raisins (may use only dates if desired)
2 egg whites, unbeaten
4 egg whites, beaten
2 T honey
1 t vanilla
1 t cinnamon
1/2 C whole wheat flour
1/2 t baking powder

Directions:
     Chop Oat Bran flakes in a blender or food processor.  Blend in dates and 2 egg whites until dates are well mashed.  Place date mixture in a large mixing bowl and set aside.
     Beat 4 egg whites in an electric mixer until foamy.  Gradually beat in honey and vanilla and continue beating until whites are thick and shiny.  Mix together cinnamon, flour, and baking powder.  Reduce speed and lightly fold dry ingredients into whites.  Stir 1/2 of the egg white mixture into the date mixture, then carefully fold in the remaining egg white mixture.  Drop by spoonfuls onto two non-stick cookie sheets and bake in a 350 degree oven for approximately 20 minutes or until light brown. 
     Makes 30-36 cookies.

My substitutions/additions:
Aside from all the subsitutions I made that may or may not have led to this recipe's ultimate demise, I used one whole egg instead of the two egg whites.  I hate to waste eggs.  If that was wrong, it was the least of this recipe's problems. 


Review:
They turned out more like bread instead of cookies, all you could taste was cereal and raisins.  They also didn't make nearly 36.  I got about 27.  They don't take anywhere near 20 minutes to bake either, so I burned the bottoms on the first batch.  Also, this recipe doesn't say anything about greasing the pans.  Dear friends, please grease your pans.  Even though these were a spectacular fail, I am going to try them again.  Do things properly before I totally chuck it.  They also need maybe oatmeal or nuts to give them a little more texture.  That said, the boys love them.  I think they're hard up for cookies in this house.  But at least they've not gone to waste.

Wednesday, March 16, 2011

St. Patrick's SemiFail

I tried, ya'll.  I really did.  I've been looking in my box for anything that could be remotely related to St. Patrick's day.  I don't have anything even sorta Irish, so then I thought, OK, I'll do something green.  Apparently I've never put anything green into my recipe box besides cucumber soup, which is good, but better for Summer.  But then I remembered my Mom's Jello recipe.  I could  put green food coloring in it and make it all Irish and junk!  Then I realized I didn't have any jello.  But I did have agar and vegan marshmallows, so I could be all green and vegan and junk!  And what happens when you combine awesome jello salad with great agar jello and add green food coloring?  You get this:


Looks a little like guacamole, dunnit?

It tastes fine.  Not worth the calorie load, though.  The original recipe is so good.  The agar jello recipe is also very good.  The concoction above is a less than successful combination of the two.  I'm not going to suggest you make it.  But I am going to very highly suggest you try them separately.

Hubby has named Mom's recipe the following:

Grab-Bag O' Jello-y Goodness
3 oz lemon jello
1 C boiling water
1C cold water
1 or 2 large apples cored and diced
3/4 C miniature marshmallows
1/2 C walnuts
1/2 C diced celery
1/2 C mayo
1 T lime juice

Make jello following instructions on box.  *Chill till slightly thick, stirring occasionally.  Mix in the apples, celery, nuts, and marshmallows.  Combine mayo and lime juice in separate bowl and pour over jello.  Stir in.  Pour into 1 qt jello mold.  Refrigerate till set.  Unmold and serve.  *Or use quick set method...6 ice cubes instead of cold water.

Review: 
Don't let the mayo throw you off.  You won't taste it, I promise.  This is so good.  You can easily sub pecans for the walnuts, too.  I don't make this very often so the boys haven't tried it, but hubs is a big fan!

Agar Jello
(Recipe from eHow.)
1 C fruit juice (per serving)
1 T agar agar (per serving)

Boil the juice and melt the agar into it, stirring consistently, until completely dissolved.  Pour into serving containers.  It will begin to set at room temperature, but you can also chill it.  It will be fully set in about an hour.

Tips: 
  • My grocery store was out of agar flakes, but I did find some strands.  I just pulsed the tar out of them in my blender until they were small, uniformish pieces and it works just fine.  
  • I've tried apple juice and orange juice.  They are both great!  Any other fruit juice would probably be good, too.
  • You can find agar in the Asian section of any well-stocked grocery store as well as online.

Review: 
It's very nice, lower calorie, all natural, vegetarian, and easier to make than jello, in my opinion.  The boys love it and I make it regularly.

I promise you'll have better results than I did!
Related Posts Plugin for WordPress, Blogger...