Thursday, January 30, 2014

A Post About the Super Bowl. Yes, that Super Bowl...

     There are a lot of folks out there who love football.  I am a folk who enjoys listening to football on the radio.  The commentary is more interesting and the commercials are less flashy.  We may make an exception this Sunday since the Seahawks have made it to the Super Bowl.  The excitement is a raging contagion here.  People talk to each other in line at the grocery store or standing at their cars pumping gas.  Even my boys, one of whom thinks it's called the "Super Goal," are pumped up, counting down the days till the Hawks battle the Broncos over a small brown ball and bragging rights.

     If you are one of those folks who loves a good game, I've got a little menu here I think you might enjoy.  If you're not, I've got a little menu here I think you might enjoy.  A burrito bar is a great way to feed vegetarian and carnivores simultaneously without too much fuss.  This one has a few different options.  My favorite combo is the sweet potatoes with rice, kale, beans and avocado.  My boys prefer just bean and cheese.  Lettuce, chips, rice and beans with a little salsa makes a great salad.

Burrito Bar options including beans, rice, goat cheese, sweet poatoes, kale, onions, jalapenos, sour cream, salsa, and salad

Everything on the bar can be prepped ahead except the meat, avocado, and the sauteed veggies. 

Pico De Gallo

8 oz tomato, chopped
2 oz garlic, minced
4 oz green pepper, diced
4 oz onion, diced
1/4 tsp salt
1/4 tsp lemon or lime juice (optional)
1/4 C chopped cilantro (optional)

Mix all ingredients and serve immediately or up to a day later.  Stir in a minced avocado and you've got a top notch guacamole.

     For a family friendly celebration, a Mockarita may be the way to go.  My boys had mixed reactions, but I liked it a little less sweet.

 Mock margarita.  Non-alcoholic drink for your next Mexican party.

Mockarita

6 limes
2 navel oranges
1/2 ruby red grapefruit
3/4 C sugar
2 C ice
2 more C ice (optional)
1/2 C sugar (optional)

I peeled the skin off the limes, oranges and grapefruit with a knife, checked for seeds, and threw the fruit into a blender.  I buzzed it up, then strained the pulp out.  I returned the juice back to the blender and added the sugar and ice.  A few more seconds and they were ready to pour!  You could jazz these up with some tequila but the virgin version is just as exciting in my opinion.

     We followed up our feast with some Tres Leches Cupcakes.  The recipe I used came from a cookbook, but you can use any recipe you want.  I wanted to make sure with all the extra liquid that these would hold up.  I tried some in nut cups and some in these fluted cake cups.  They both held up extremely well, though the cakes in the nut cups pulled away from the sides.  These fluted ones were definitely much prettier.  I cut the baking time down to 20 minutes from the 30-35 which was recommended for a full cake.  The recipe I used also suggested a sweet whipped cream frosting.  I just chose whipping cream and vanilla for mine and relied on the sweetness in the cake and milk glaze. 

How to turn a Tres Leches cake recipe into cupcakes.

Have a nice Superbowl Sunday!

Friday, January 17, 2014

Well, it took me long enough...

     A belated Happy New Year to all you fine folks out there!  We've been through the wringer since Christmas!  We had friends out the week after Christmas and my family has been sick ever since.  We're still sick.  I think I can honestly say between ER visits, doctor's offices, and trips to Urgent Care, our family has spent an entire 24 hour period being scrutinized by a physician.  I'm beginning to think this is just how our life is going to be.  We're just going to grow roots into the couch, facial tissue will fuze to our clammy, feverish palms and we will drain gross things out our nose holes for the rest of time.  My husband ended up with an entire head infection, the boy's have had two colds already, and I think there's a good chance I've got an ear infection flaring up.  Seriously?  What the fnob?!  So there you go.  We've been eating a lot of whatever I can scratch together from stuff in the pantry.  It's not pretty.

     I signed us up for a flow cookie decorating class in a fit of insane optimism before I resigned myself to being sick for all eternity.  The date of which happened to coincide with a temporary slow-down in face drainage so we went.  And let me preface this with: There was A LOT of hand washing. We tried really hard not to share.


We learned how to make an outline, fill it in, make spiderwebs, flowers, hearts, Christmas trees and how to use luster dust.  The boys were naturals!   I really want to take the advanced class soon.


There were adults and kids taking this class, my youngest is 6, but the instructor said they've even had 3's in class!  She was just as comfortable instructing the kids as she was showing the adults what's up.  I couldn't be more impressed.

 My youngest was very prolific.  He made two boxes worth of cookies!

My eldest made lots of cookies, too and this guy was my favorite of the day.  The best skull and crossbones EVAR!


Most of these are mine.  It was a fun day.  I hope we can do it again soon, but in the mean time, if you need me, I'll be honkin' and blowin' on my couch.

   If you would like to take a class and live in the Bothell, WA area, Dawn's Candy and Cake is the place to do it.  She's got lots of reasonably priced classes on candy making, cake decorating, cookie decorating and there is even a cake decorating club that meets there regularly!  And when it's time to try it at home, she can hook you up with everything you need, handy, right?  This is not a paid advertisement, I just believe in supporting local business!

Monday, December 23, 2013

I've had me a day...

I was going to write a post all about how my awesome and beautiful gingerbread house came to be.  In the past, I've made houses that looked like this:

 2010, first gingerbread house ever.  Construction was a little saggy, but I did a pretty good job piping stuff considering I'm really, really bad at it.

And This:

 2011: Ice cream cone trees, little stands for the ginger bread folks to stand on, pretty good piping again, chimney addition.

And This:

2012: Kirby and a fisherman join the scene and I toyed with pretzel windows.  It was the first year for a cereal roof, which fell off twice before finally staying put.  The boys did a lot of the piping in this one because 1) I was sick as a dog and 2) They are actually really good at piping.  They were 4 and 6, people!  4 and 6!  Look at that star!

Every year, a little more practice, a little better execution, a little more detail... I figured by the fourth go around I'd be ready to lay something gorgeous on ya'll.

But since I'd got all creative and fancy blogger pants, I thought I'd change to a different recipe for the house AND also change the glue.  This is what happened:


And this:
 And this:

Nailed it.

So what I'm giving you instead is a lesson in... I dunno... stubbornness and a shear force of will on the part of my children to consume as much gingerbread house candy as humanly possible without exploding like that guy on Monte Python. 

I ran to the store and bought graham crackers and canned frosting.  Yup.

And my son, who just turned 8 still rocked it with the piping.  Look at those icicles!

And my son who is about to turn 6 is rockin' some hella-cool architecture skillz.


 And I got to put my cereal roof on again.

And the moral of the story is that no matter what you have planned for the holidays, if you're with people you love, it's time well spent no matter how it turns out.

Tuesday, December 17, 2013

12 Days of Christmas Treats Day 12: Applesauce Ornaments

12 Days of Christmas Treats Day 12: Applesauce and Cinnamon Ornaments

     "What?" you say.  How come no eating food stuffs on the last day of Christmas Treats?  Well, because this is the last day of Christmas Treats probably forever.  It takes a lot out of me to do such a long session and during this really busy time of year, I just can't take so much time away from my family!  I will probably do some Christmas posts next year, but I think 12 Days has run its course.*  So I'm ending on a beautiful note with these fun applesauce ornaments.  They are mostly made with food ingredients, so give me a little credit.  These are a great craft for kids now that school's almost out for the season and when they're baking they make your house smell yummy!  They keep their scent all winter and store pretty well if you're careful with them so they will greet you with cinnamon goodness this time next year, too!

12 Days of Christmas Treats Day 12: Applesauce and Cinnamon Ornaments

*Unless I get like 6,000 people begging me to do it again because they can't survive Christmas without me, of course.  Feel free to beg.  It probably won't take too much arm twisting, to be honest.  Commenting on my beauty and cleverness will get you far.  

12 Days of Christmas Treats Day 12: Applesauce and Cinnamon Ornaments

Cinnamon Applesauce Ornaments
1 C cinnamon
1 C applesauce
1/4 C Elmer's glue

Stir ingredients together, wrap in plastic and let sit for 1 hour.  Preheat the oven to 200°.  Roll dough out between two sheets of wax paper and cut with Christmas cookie cutters.  Don't forget the hole for hanging, a straw or a toothpick are great tools for this.  Line a cookie sheet with wax paper and bake ornaments for 2 hours, flipping half way through cooking time.  Enjoy the aroma.  When ornaments are done, remove from sheet, let cool and hang them onto your tree!  If you have time, these can also air dry, but they take a few days before they're done completely.

Word to the wise:
Don't rely on any mystical non-stick properties your cookie sheet claims to possess.  Trust me on this.  These ornaments scoff at your naivete and spit in the eye of your sheet's non-stick assertions.  They will cling to your cookie sheet with the unholy force of 1,000 possessed weasels.  We're talking honey badger level not caring about your cookie sheet's non-stickiness. 

12 Days of Christmas Treats Day 12: Applesauce and Cinnamon Ornaments

Word to the unwise:
If you did just go ahead and bake these without the wax paper, I know your pain.  Soaking the cookie sheet for a day in water should do the trick.  You'll end up with a nice clean pan, but unfortunately probably no usable ornaments...  (I think we managed to get one off.  It disappeared so either the boys broke it or the cat ate it.)

12 Days of Christmas Treats Day 12: Applesauce and Cinnamon Ornaments 

Review:
This makes really nice dough that's easy to work with.  The boys loved making all sorts of figures with it and they actually hold up pretty well.

Monday, December 16, 2013

12 Days of Christmas Treats Day 11: Lasagna

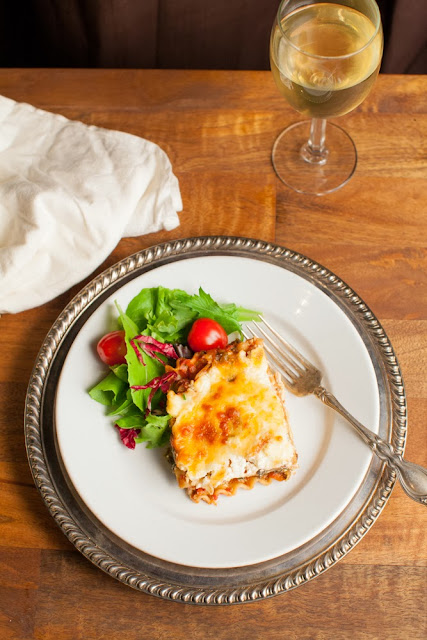
Another Christmas tradition my Mom started is the Christmas Day Lasagna. She got tired of cooking her tail off all day on Christmas to make a turkey happen so she started baking lasagnas on Christmas Eve and re-heating them on Christmas day. She used jarred sauce, and you certainly can, too, but I like to make my own sauce.  This lasagna uses uncooked noodles.  Don't worry, you can use any lasagna noodle, you don't have to buy the fancy no-cook ones.  Trust me on this, it works!  My friend Susan has been doing it this way for years, and I have too since she told me about it.

Make-ahead vegetarian lasagna for Christmas dinner
Sauce:
1 Tbs olive oil
1 C roughly chopped onion
¾ C roughly chopped green pepper (about 1 medium)
2 C sliced button mushrooms
½ portobello mushroom, cubed, gills and stems removed
2 cloves garlic, pressed
¼ C white wine
1 Tbs tomato paste
3 C canned crushed tomatoes and juice (I used some I canned myself, it took 2 pints)
¼ tsp pepper
1 tsp salt
1 tsp oregano
1 Tbs basil

In a large frying pan, heat olive oil then add onion, green pepper, button and portobello mushrooms and cook over medium-high heat for 5-8 minutes until vegetables have softened, but not browned. Press garlic into pan and cook until the aroma blooms, about 10 seconds. Deglaze the pan with with white wine and cook until wine has boiled off. Add tomato paste, tomatoes, and salt and pepper. Boil for 10 minutes, until the mixture is more sauce and less soup. Turn off heat and stir in oregano and basil. Hold off to the side while you assemble the lasagna or keep in fridge for a few days until you're ready to use it.

Make ahead vegetarian lasagna for Christmas dinner

Lasagna:
1 box whole wheat lasagna noodles, uncooked
1 sauce recipe
32 oz ricotta
5 oz fresh spinach, washed and lightly drained
4 oz chanterelle or button mushrooms
8 oz mozzarella, shredded

Decor:
1 slice carrot, cut into star shape (alt, yellow pepper)
½ green pepper, sliced
4 cherry tomatoes, halved

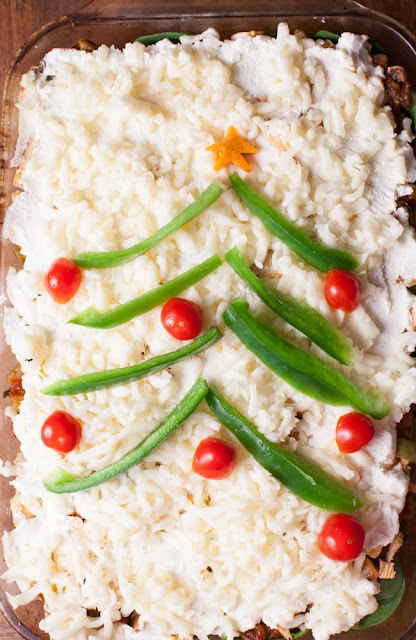
Preheat oven to 325°. Place three uncooked noodles in the base of a 9X13 inch pan. Snap a quarter piece off another noodle and place it across the short side of the pan where the other noodles don't touch. Pour ½ of the sauce recipe over the noodles. Then ½ of the ricotta cheese. Shake the extra water off the spinach, but not to the point of being totally dry, and add a spinach layer. Next comes another layer of lasagna noodles, this time using four and ¾ noodles. The rest of the sauce comes next. Then a layer of chanterelle or button mushrooms. Carefully spoon the remaining ricotta cheese over the mushrooms to create a white field. Top with shredded mozzarella. Arrange the green peppers into a tree shape, decorate it with red cherry tomato ornaments, and top it with the carrot star! Bake for 1 hour or until the noodles are soft. To put in the fridge, just let cool, cover with plastic or aluminum, and re-heat in the oven at 350° covered until warm (about 45 minutes).

Make ahead Vegetarian Lasagna for Christmas Dinner

Review:

We love this lasagna (even though my youngest will tell you he hates it, once he figures out it's like pizza and pasta all mixed up together, two servings will be in his belly before the night is out).  You can make it with meat or any filling you like, ours is hardly ever the same twice!

Friday, December 13, 2013

12 Days of Christmas Cookies Day 10: World's Best Brownies

     I have a confession to make.  My Mom had the secret to the world's best brownies.  She sent me the recipe 10 years ago.  And I've never made them...  *hanging head in shame*  The problem with making a pan of brownies is that I will eat a pan of brownies.  By myself.  Hiding in the closet so as not to be interrupted.  And I will be happy.  And covered in crumbs.  And in need of a crane to get out of the house.  So in the interest of not putting myself into a chocolate coma, I don't make brownies.  I once made a pan of vegan brownies that had black beans in it just to see what would happen.  I went up a pant size is what happened.  So just for you guys and just for Christmas I have decided to face my addiction and make these just for you.  If you do indeed become a closet brownie eater, don't come cryin' to me.  I gots my own problems.  Like how to hide this empty pan as quickly as possible.


World's Best Brownies
Yield: 1 9X13 inch pan

1/2 C butter
4 oz baking chocolate
4 eggs at room temperature
1/2 tsp salt
2 C sugar
1 tsp vanilla
1 C flour
1 C roughly chopped pecans (opt)

Prepare 9X13 inch pan by lining the bottom with parchment paper.  Preheat oven to 350°. Melt chocolate and butter in a double boiler or the microwave (being careful it doesn't boil).  Place in the refrigerator for a few minutes.  Beat eggs and salt until light in color and foamy.  Continue beating and gradually add sugar and vanilla until well creamed.  Remove chocolate from refrigerator.  With a few swift strokes, manually combine the cooled chocolate mixture into the eggs and sugar.  Before the mixture becomes uniformly colored, fold in (again by hand) flour.  If you want to add nuts, before flour is uniformly colored, stir in pecans gently.  Bake for 25 minutes if you want super gooey, not-quite finished brownies, 40 minutes, if you like them soft, but not oozing.  A toothpick test won't work well, but if you touch lightly in the middle of the pan, it should not leave a dent and the top will look done.  Remove the pan from the oven, run a knife around the edges and invert the baking pan over a cookie rack.  Remove pan and wait 5 minutes before peeling off paper.  Or you can just eat them out of the pan with a fork in your closet...


Review:
These are the best brownies in the entire world.

Thursday, December 12, 2013

12 Days of Christmas Treats Day 9: Chewy Eggnog Cookies


     Have I got a recipe for you eggnog lovers out there!  I always love a chewy cookie but am rarely successful in making one at home.  The folks at America's Test Kitchen came up with an easy one that works pretty well.  It's not as ooey-gooey chewy as the ones at the store, but it's also not sporting the entire contents of a university chem lab in the ingredient list.  A couple of years ago I created an eggnog cookie with quite a bit more nog in it.  I was surprised how little it took in these to make a recognizable flavor.  This recipe is entirely an ATK invention, the only thing I did was sub in eggnog for the milk.

Chewy Eggnog Cookies
Yield: 2 dozen

2 1/4 C flour
1 tsp baking powder
1/2 tsp baking soda
1 1/2 C sugar, plus more for rolling
2 oz cream cheese, cut into 8 pieces
6 Tbs unsalted butter, melted and still warm
1/2 C vegetable oil
1 large egg
1 Tbs eggnog
2 tsp vanilla extract

Adjust an oven rack to the middle position and heat the oven to 350°.  Line two large rimmed baking sheets with parchment paper.  Whisk the flour, baking powder, baking soda, and salt together in a medium bowl.  Set aside.

Place 1 1/2 C sugar and the cream cheese in a large bowl.  Place the remaining 1/3 C sugar in a shallow baking dish or pie plate and set aside.  Pour the warm butter over the sugar and cream cheese and whisk to combine (some small lumps of cream cheese will remain but will smooth out later).  Whisk in the oil until incorporated.  Add the egg, milk, and vanilla; continue to whisk until smooth.  Add the flour mixture and mix with a rubber spatula until a soft homogenous dough forms.

Divide the dough into 24 equal pieces, about 2 Tbs each.  Using your hands, roll each piece of dough into a ball (handle dough as briefly as possible as overworking will result in flatter cookies).  Working in batches, roll the balls in sugar to coat and set on the prepared baking sheet.  12 dough balls per sheet.  Using the bottom of a drinking glass, flatten the dough balls until 2 inches in diameter.  Sprinkle the tops of the cookies evenly with the remaining sugar, using 2 tsp for each sheet. (Discard the remaining sugar.)

Bake the cookies, one sheet at a time, until the edges are set and beginning to brown, 11 to 13 minutes, rotating the sheet after 7 minutes.  Cool the cookies on the baking sheet for 5 minutes; using a wide metal spatula, transfer the cookies to a wire rack and cool to room temp.


Notes:
      So I used a cookie scoop instead of dividing by 24 to make my cookies.  The result was around 54 thinner cookies.  This is probably why they weren't super chewy.  (They're still super delicious!)
Related Posts Plugin for WordPress, Blogger...