Friday, November 29, 2013

Welcome to Our Laboratory...

(Extra points if you read that in Edgar Oliver's voice.)

Lava lamp, plasma disk, fiberoptic finger lights for a Science Party
The boys got a Science Party for their birthdays this year!

Lab Coat and Lanyard Kit for a Science Party
     As they entered the lab, all the kids got a badge and a lab coat first thing, and then we turned them loose to experiment to their heart's content!  There were 5 stations.

Learning about constellations at our Science Party
     The kids learned a little about Interplanet Janet at Nicolaus Copernicus' Astronomy station, where they put star stickers on constellation sewing cards I found at Mrs. Home Ec's blog.

Non-Newtonian Fluid, FX/Insta Snow, Microscope action at our Science Party
     I'm not sure if they were more frightened, or mad, or excited, or glad to be playing with non-newtonian fluid, making fx snow, and exploring algae with a microscope in Marie Curie's Chemistry Station.  I'm thinking excited and glad, though...  We pre-measured the snow into some petri dishes and they used disposable pipettes to add water a little at a time.

Static Electricity, Plasma Dish, Plasma Ball, and Fiber Optic Finger Lasers for our Science Party
     In Nicola Tesla's station, we were talkin' 'bout electricity.  Mostly the static kind, but we also had a pocket plasma disk, some fiber optic finger lasers,  and a rockin' cool plasma ball we borrowed from a friend.

Marble maze, Marble tunnels, and paper airplanes for Eintein's physics station at our Science Party.
     In Albert Einstein's Physics Station, marbles, balls, and paper airplanes became victims of gravity. (down-de-down-down-down)

Dry ice adds a super cool element to our Science Party     David (a.k.a. our friend with the plasma ball) is also a super science geek and offered to show the kids some tricks with dry ice.  You can't skate a figure 8 on dry ice, but you can do some pretty wikkid science with it!  I was glad we had some beakers on hand as decoration because they totally added to the sciencey vibe!

Ellen Swallow Richards coined the word ecology and we composted all our partyware in her honor after our Science Party!
     Because we wouldn't want to be accused of wasting energy, and also to honor the totally awesome Ellen Swallow Richards, who coined the word "ecology" as well as being an MIT grad and the inventor of Home Economics (as science, y'all), all our utensils, plates, cups, napkins, and even the trash bag were biodegradable and disposed of in the Ellen Swallow Richards Composting Station.

The ol' stand-by dye the carnations experiment.
     For decor, the boys and I performed the carnations in the colored water experiment.  I really wanted to sing,  "Come on do the circulation" the whole time. *Quick note, Steve Spangler's website says it takes 24 hours for the dye to show up, but it really needs more like 48. Also, all I could find at the time were yellow carnations.  We have run the experiment again with white carnations and had much more noticeable results.

Even the grown-ups had fun with the experiments at our party!
     Even though as adults we're usually trying to teach our kids to always say thank you or at least say please, it seems there's a little room for scientific exploration even as grown ups (which makes me deliriously happy to see).

Gluten-free, Organic, Dye-free, Sugar-free food including watermelon water molecules!
     To put a little energy into their high-powered, revved-up body machines, I served a gluten-free, non-GMO, food coloring-free, sugar-free, mostly vegan spread.  Including watermelon water molecules.  I made melon balls with honeydew and watermelon and used halved toothpicks to hold them together.  (*Adult supervision required for the younger set...*)  You could do a similar, savory version with bocconcini cheese and cherry tomatoes.  We have lots of friends who are gluten and grain free, so this year I made a gluten-free, processed sugar-free cake from The Spunky Coconut.  It was incredibly moist and if you like coconut, you're going to love this cake!  I served my go-to chemical-free homemade soda again, this time with mango juice.  My favorite though, was the fruit juice and agar brain!

A fruit juice and agar brain, vegan, sugar and dye free, and perfect for a science or halloween party!
      I loved how firm and opaque this looked, it's vegetarian so I and my vegan friend can partake, and agar is what scientists use in petri dishes when they make cultures so I was triple geeked about this!

Vegan, Sugar-Free, Food Coloring-Free "Jello" Brain
4 1/2 tsp agar powder
6 cups unfiltered apple juice

In a pot, bring  juice just to a simmer (not boiling), then add agar. Stir well and bring to a boil, reduce the heat, and simmer, stirring often, for 5 minutes or until the agar has dissolved.  Pour "jello" into a lightly oiled brain mold (trust me on this, the standard gelatin mold release tricks won't work on agar).  Cover and chill about 2-4 hours or until set. 

(You can use any juice with this, and if you want to add a little sugar, honey, or agave you can, though I don't find it necessary.  If you want to add a little extra weirdness, float some fruit chunks in there!  Apparently kiwi and pineapple interfere with the set, so skip those.)

And remember...
It's never too early to learn and enjoy science!
As your body grows bigger, your mind must flower.  It's great to learn, because knowledge is power!!


He thinks this is what a mad scientist looks like...
Whether or not all that power turns you into an evil scientist is up to you... (Me thinks this one has more Doofenschmirtz than Frankenstein about him...)

Thursday, November 28, 2013

Happy Thanksgiving!!


Well, there he is!  Our beautiful heritage bird!  Everybody loved it.  They said it wasn't dry at all and had a super "turkey" taste.  I hope you had a wonderful Thanksgiving and spent it with someone you love!

Tuesday, November 26, 2013

Another Wonderful Year...

     My blog is three today!  I am astonished how far my photography has come.  It was an afterthought.  When I started the blog I was just going to do some recipes give them a review and call it a day.  A friend suggested I start adding pictures.

They looked like this:

And this:

And this:

Yikes.

Somehow, I fell in love with the medium of photography.  The fickle partner that is sunshine in the Pacific Northwest, the food that refuses to look beautiful even though it's delicious, the ever elusive perfect styling set up.  And yet, I love it.  I.  Love. It.  This year I did my first professional photo shoot.

They looked like this:
Uncle Eyal's Baba Ganouj Photo Shoot

And this:
Uncle Eyal's Zahug Photo Shoot

 And this:
Uncle Eyal's Kyle

 I think a little celebration is in order.

Old-Fashioned Chocolate Cake from America's Test Kitchen

Old-Fashioned Chocolate Cake
Recipe from The America's Test Kitchen Family Baking Book, p. 298
Serves 8-10 

1/4 C Dutch-processed cocoa powder, plus extra for dusting
1 3/4 C all-purpose flour
1 1/2 tsp baking soda
1 tsp salt
1 C buttermilk, room temp
2 tsp vanilla extract
4 oz unsweetened chocolate, chopped
1/2 C hot water
1 3/4 C sugar
4 large eggs, room temp
2 egg yolks, room temp
12 Tbs unsalted butter, cut into 12 pieces and softened

1. Adjust an oven rack to the middle position and heat the oven to 350 degrees.  Grease two 8- to 9-inch round cake pans, then dust with cocoa powder and line the bottoms with parchment paper.  Whisk the flour, baking soda, and salt together in a medium bowl.  In a small bowl, whisk the buttermilk and vanilla together.

2. In another medium bowl, combine the chocolate, 1/4 C of the cocoa powder, and hot water and set over a large saucepan of barely simmering water, making sure the water does not touch the bottom of the bowl.  Heat the mixture, whisking often, until the chocolate is melted and the mixture is smooth, about 2 minutes.  Stir in 1/2 C of the sugar and continue to heat until thick and glossy, 1 to 2 minutes.  Remove the bowl from the heat and set aside to cool.

3. In a large bowl, whip the eggs and egg yolks together with an electric mixer on medium-high speed and gradually add the remaining 1 1/4 C sugar, about 1 minute.  Continue to whip until mixture is very thick and voluminous, 4 to 8 minutes.

4.  If using a standing mixer, replace the whisk with the paddle attachment.  Beat the cooled chocolate mixture into the egg-sugar mixture on medium speed until thoroughly incorporated, 1 to 2 minutes.  Beat in the butter, one piece at a time, about 30 seconds.

5.  Reduce the mixer speed to low and beat in one-third of the flour mixture, followed by half of the buttermilk mixture.  Repeat with half of the remaining flour mixture and the remaining buttermilk mixture.  Beat in the remaining flour mixture until just incorporated.

6. Give the batter a final stir with a rubber spatula to make sure it is thoroughly combined.  Scrape the batter into the prepared pans, smooth the tops, and gently tap the pans on the counter to settle the batter.  Bake the cakes until a toothpick inserted in the center comes out with a few crumbs attached, 25 to 30 minutes, rotating the pans halfway through baking.

7.  Let the cakes cool in the pans for 10 minutes. Run a small knife around the edge of the cakes, then flip them out onto a wire rack.  Peel off the parchment paper, flip the cakes right side up, and let cool completely before frosting, about 2 hours.

Vanilla Frosting
Makes about 4 C, enough for a sheet cake or 2-layer cake
Be sure to use unsalted butter here.

3 sticks unsalted butter, cut into chunks and softened
3 Tbs. heavy cream
2 1/2 tsp. vanilla extract
1/4 tsp. salt
3 C (12 oz) confectioner's sugar

1. Beat the butter, cream, vanilla, and salt together in a large bowl with an electric mixer on medium-high speed until smooth, 1 to 2 minutes.

2.  Reduce the mixer speed to medium-low, slowly add the confectioner's sugar, and beat until incorporated and smooth, 4 to 6 minutes.  Increase the mixer speed to medium-high and beat until the frosting is light and fluffy, 5 to 10 minutes.

This cake is vanilla in the middle, so I took 1/3 out, then added 1/2 cup cocoa powder and mixed it in well. 

Review:
You're gunna want a big glass of milk with this.  And maybe some vanilla ice cream.  Whether it's a birthday, a milestone, or just a nice, clean kitchen, this is definitely the cake for your celebration!

Friday, November 22, 2013

A Very Vegetarian Thanksgiving...

     So you guys know I totally love me some Thanksgiving sides, but I realized I haven't posted any main dishes for vegetarians, so I thought I'd do one up.  And then I decided to do a couple more sides.  Because whatevah, I do what I want.  For those of you with ovens full of turkey, this vegan bean dish is perfect for the slow cooker!

vegan emergo white runner beans for Thanksgiving

Slow Cooker Herbed White Beans

1.25 lbs bag of Emergo (aka white runner) beans, pre-soaked, other options are cannellini, navy beans*
6 C water
1 tsp butter
1/2 C chopped scallion
2 cloves garlic, pressed
1 3-inch sprig rosemary
3 2-inch sprigs thyme
6 leaves fresh sage
2 tsp.salt
pepper

Quick-soak the beans in salted water by bringing them to a boil, turning the heat off, and letting them sit for an hour.  Drain.  Melt butter in a pan and cook scallion till soft.  Press in garlic and cook till fragrant.  Pour beans into crock pot, add water and salt, stir, then add the rest of the ingredients.  Cook for 8 hours.  (Cooking time/water ratio may vary with different beans)

*If you decide to sub another kind of bean, be cautious using kidney beans in a crock pot, they can make you very sick if they are under cooked.  Using a modified quick-soak method on red kidney beans is the ideal way to make sure you have removed the poison, making sure you boil them for 10 minutes before leaving them to soak.

roast green beans with balsamic thyme reduction for Thanksgiving

Roast Green Beans with Balsamic Thyme Reduction
Yield: 6-8 small servings

2 lbs fresh green beans, stems and strings removed
1 Tbs sea salt
1/2 C balsamic vinegar
2 sprigs thyme
1/2 tsp honey (optional)
1/2 C raw pecans

Preheat oven to 350°.  Rinse greenbeans and drain slightly spread them in a single layer on a baking sheet.  Sprinkle with salt.  Bake greenbeans for 10-15 minutes until beans are tender, but not too browned.  Timing may vary depending on how wet they are when they go in.   On a smaller separate tray, spread a layer of pecans and bake for 2-3 minutes until roasted.  They will burn easily so keep an eye out!   In a small pan, add vinegar and thyme and heat balsamic until it boils.  Stirring constantly, to keep from burning, boil vinegar until it thickens and becomes syrupy.  It doesn't take long.  Sweeten with honey if you'd like.  Pour reduction over beans and stir to combine.  Sprinkle with pecans.

mashed potato ratio for large gatherings

     Most people know how to make mashed potatoes and there are tons of recipes and discussions on the best potato type out there so I won't bother.  Instead I will give you a good ratio for making as many mashed potatoes as you need no matter how large your guest list.  Incidentally, this ratio applies for mashed cauliflower, turnips, rutabagas, or even sweet potatoes.  Mix it up a little this Thanksgiving!

Ratio Mashed Potatoes:
1/2 lb potatoes per guest
3 Tbs milk per 1/2 lb*
1 tsp butter per 1/2 lb
2 tsp sour cream per 1/2 lb (or plain yogurt)
1/4 tsp salt per 1/2 lb
1/8 tsp pepper per 1/2 lb
chives, parsley, thyme, or rosemary as garnish
*liquid ratio may vary depending on potato type

Peel, cube, and boil potatoes until tender.  The smaller the cubes, the faster this will happen.  Drain.  Mash with a potato masher or use a ricer.  Stir in milk, butter, sour cream, salt, and pepper.  Taste for any adjustment.  Top with garnish when serving.

I hope you all have a wonderful Thanksgiving!  I'll keep you posted on my heritage bird adventure!

Friday, November 15, 2013

It's Sneaking Up on Me, I Can Feel it...

It's about to pounce...  That time of year when all heck breaks loose around here.  After Halloween begins the long downhill slide of merriment until the New Year arrives.  We've got two birthday parties to attend, one to throw, two more small home birthday celebrations to deal with, Thanksgiving, 12 Days of Christmas Cookies, 25 days of Advent, Christmas, and the arrival of our dear friends for a week-long visit all between now and next year.  Plus there's supposed to be school, martial arts, piano lessons, and swim lessons in there somehow.  And all you guys out there probably have similar schedules!  It's just that time of year.  It's the most wonderful time of the year.  It's going to kill me.  And I wouldn't change a minute of it if you paid me.

One thing I'm doing different this year for Thanksgiving is that we're actually going to have real live guests here with us for dinner finally.  Since my husband and I got married, we have always had people over for Thanksgiving.  Every year a revolving list of friends has feasted with us depending on what family plans people had.  One year we had one person.  Our largest gathering was 10.  When we moved to Washington though, we just never found anyone who could join us.  Everybody had family here and plans.  But this year I ordered a turkey.  And not just any turkey.  One of these turkeys:

Photo Courtesy: R Heritage Farm

That's right, folks.  One of these beautiful animals is ours.  My friends Monique and Ben at R Heritage Farm are selling heritage, GMO-free, pastured turkeys.  (I hear there may even be a few left if anyone's interested.)  Note how colorful they are.  How they are roaming around completely cage-free on green stuff I understand some people call "grass."  They may occasionally (try not to faint, y'all) eat a bug.  If I'm going to cook an animal, this is how I want it to be raised.  Pay attention, farmers.  If one of these gorgeous, grumpy gobblers is going to give his life to feed my family, I wanted to make darn sure none of him was wasted so I put the word out on facebook and lo and behold we had a friend in town!  I am so excited to be having guests again I can hardly contain myself.

I am going to cook the bird low and slow just like the good old days and I will probably trot out lots of traditional (yet vegetarian) sides to go with it.  I'll post a picture of the bird once it's done if I can get one before the horde descends.  To inspire you a little, here are some recipes I've made in the last few years.

Mains:

Apple and Sage Roast Chicken
Simple Roast Chicken
Sides:

Brussels Sprouts with Balsamic Vinegar
Roast Fennel
Roast Vegetables with Quince
Vegetarian Mushroom Gravy
Pears
Five-Minute Cranberry Sauce
Pears with Ricotta Cheese and Chestnuts
Butternut Squash and Sweet Potato Soup

Breads:

Whole Wheat Bread

Pumpkin and Sage Cornbread


Pumpkin and Sage Cornbread Dressing
Simple Cornbread Dressing
Desserts:

Pumpkin Not-Pie Dessert
No-Bake Cheesecake with Soft Orange Cookie Crust
Rhubarb Kumquat Crisp with Goat Cheese
Pumpkin Mousse

Hopefully, I'll get a few new ones posted soon!

Tuesday, October 29, 2013

A Monster Post about a Monster Party...

 Ever feel like you're being watched?

     Lots of eyeballs big and small kept tabs on the kids at our most recent Halloween party!  In keeping with my desire to do non-traditional Halloween parties, this year I wanted to do a Monster party.  Pinterest has just got gobs of so many cute monster party ideas that I couldn't stand it.  Many of the things you will see were inspired by pins on my board, like this eyeball monster by Dave Lowe though much of it is also straight out of my squishy gray matter. For example:


As soon as I saw these vibrant gerbera daisies, I knew I wanted some flowers and I knew I wanted eyeballs in those flowers.  A couple of 6 packs of ping pong balls and a Sharpie high later, I had an assortment of cute cartoonish eyeballs.  I bought the fern and the flowers and managed to stick the ping-pong eyes on with mounting tape.  All it took for the fern was tape, and for the flowers, I stuck a flat-head pin through a piece of tape, taped it to the ball, and stabbed the sharp end of the pin into the disk of the flower.  Worked like a charm!

     I also wanted there to be a lot of texture and color, so I bought a bunch of brightly colored boas and used them as I would streamers as well as general fluffy beauty.

There are several similar wreaths on Pinterest.  I made this one with two 6 foot boas and 6 ping pong eyes.  I just hot glued the eyes on.

I grouped all the eyes in one spot so it would look more like a creature than a decoration.

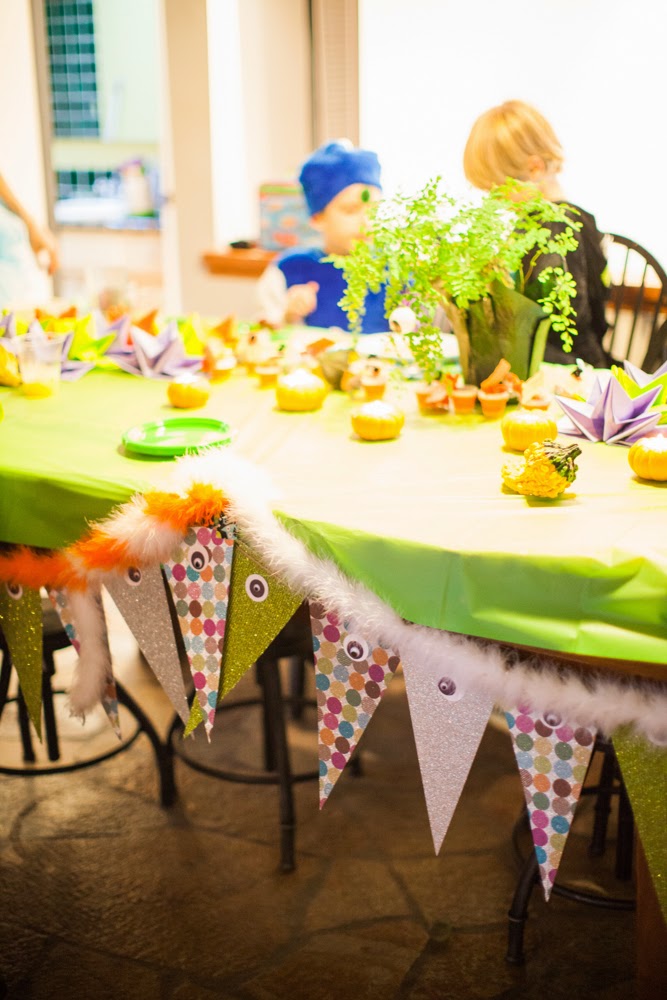
My friend Tori made this beautiful banner and I hung it on the table because it looked a little like teeth!

She also made pumpkins with candles and those super cute candy corn pots filled with candy corn and zombie finger puppets!  When I saw those napkins on Zulily I had to have them because they looked so much like monster hair!  But they were so cute, nobody used them, they thought they were decorations! 

 Of course, once all the decorations are set up and the candles lit, it's time to let the kids in, right?

This is my youngest.  He is the King of all Monsters.  He is part monster, part zombie, part ghost, part vampire, part alien, with a tentacle arm.  'Cuz hellz yeah.

Grim Reaperess here made her own scythe.  Admirable!

Homemade Sgt. Calhoun from Wreck It Ralph.  Her costume lights up!

Dr. Doofenschmertz and a bearded monk.

My other son.  A robot with a door that opens to see his innards.  Two boxes, some aluminum foil, and a trip to Ace Hardware.  Booya!

My cat.  The only one of my dependents who has not be vociferously demanding a costume for the last 363 days.  Clearly amused.

And here we have a rag-tag group of "Momsters."  Tutu tutorials are rampant on the web so I whipped up a few for these ladies, I found the leggings at Value Village and the teal and orange monster hats are something I banged together; more on those later.  The overall idea for the costume came from the blog Seven Thirty Three.  It says a lot that these ladies are willing to dress like this and tromp around in the woods with me after dark without being paid or plied with booze.

We shoved a little food in our pie holes after everyone arrived.  My contribution was:

 
Eyeball Soup.  The idea came from Martha Stewart, but I used my own recipe.

Tomato Soup
1 tsp Olive oil
2 medium onion, cleaned and sliced
2 medium sized carrot, sliced
4 small cloves garlic, pressed
4 quarts of tomatoes
6 leaves of basil, finely chopped
Salt and Pepper to taste

Heat the olive oil in a pan and saute the onion until soft.  Add the carrot and cook for 2 minutes.  Stir in garlic and cook for about 30 seconds to allow the flavor to bloom, then deglaze the pan (use any fluid you like, I used vodka).  Add tomatoes and cook until carrots are soft.  Blend the soup with a blender or immersion blender until smooth.  Salt and pepper.  Add basil just before serving.

These eyeballs are tiny bocconcini cheeses and olives.  I cut a small conical opening in the cheese with a paring knife and sliced the tips off some black olives.  Just squish 'em in!  I kept the eyeballs in a separate bowl since I put the soup in a crock pot to keep it warm and I didn't want the cheese to melt.  They kept great overnight in the fridge in an airtight container.

I also made my quick and easy homemade orange soda.

We asked our guests to bring food too, which really cut down the food prep work this year!

After food it was game time, of course!

The kids threw eyeballs into monster boxes my gal Danika made.  It's amazing how much they love having a chance to display their throwing and aiming skills.  They are based on these adorable tattle monsters from Giggles Galore.

They also played a game called "Who's got the Monster Paw?"  I modified the basic premise of "Who's got the Button?"  To make the paw, I cut the fingers out of an old glove, sewed some yarn on it, and each kid got a turn to wear it (he's actually got it on backward in this picture).  To play, one child is chosen as guesser and sent out of the room, another child is chosen to have the paw and puts it on, all the kids sit on their hands so that the paw is hidden and the guesser returns and guesses who has the paw.  As soon as the paw is discovered, the wearer becomes the guesser and leaves the room.  Play continues until everyone has had a chance to wear the paw and guess.  We played a trick on the last player and gave the paw to a grown up.  The kids loved it!

After all the stalling till it got dark, it was finally time to take them into the woods.  I sprayed each kid with some "Monster Protection Spray" (water), gave them each a flashlight, and lead the way to the forest.  I informed them that they were also going to need a disguise to keep the monsters from noticing them, too.  The first thing they got was a hat and a set of fangs.  


Later, they got some tails. Then they got to touch some actual monsters! 

These were eyeball monsters from the planet EyeGore.  I got the idea for these from the Fun At Home with Kid's blog.  I loved how her eyeballs caught the light and new I needed these things to glow in the dark.  I found six touch lights at a second hand store and knew they'd be perfect for the woods.  I had actually hoped this light would fit into the bottom of the fish bowl, but it was a little too big.  It worked out OK just to hold it underneath, though.  As for the rest of the lights:
 
Box monsters!  We had been racking our brains to figure out how to make monsters in the woods.  About a week before the party, we received some new stools in the mail, and the boxes were perfect!  I painted pupils on some lights with some patio paint and used mounting tape to affix them to the boxes.  Lauren helped me give this beauty her swagger.

This guy, who I promised the kids probably wouldn't eat them, was three boxes taped together, supported on either side with a couple of logs, and covered with leaves.  I used a piece of string to keep the eye flap open.

Their next adventure was a trek through the eyeball forest.  I got two different size white beach balls from Oriental Trading Company and painted the end opposite the inflation spout, which already conveniently has that round patch.

Even the roots had eyes thanks to Danika and Matt!


The final pieces of their disguise were some eyes and antennae. Then I dropped the bomb on them!  Instead of "Monster Protection Spray," I had actually used "Turn to Monster Spray!!" They were going to be stuck like this for the rest of the night!  In order to release them back into the wild, they were going to have to be cataloged.


Then back to the house to wild rumpus it up for a few more minutes before it was time to go home!


My kids have been wild rumpusing it up for a few days now...

I hope you have a monstrously fun Halloween!

P.S. I've got gobs more Monster Party ideas pinned on my Pinterest Board.  I'm also considering making a tutorial on those hats if you guys want it.
 
Related Posts Plugin for WordPress, Blogger...